Sometimes it's nice to do something for your children yourself. In this case, it is possible to do something non-standard, for yourself and as you like. The children are growing up and it was time for them to give up their bedroom - a small room. To save space, we decided that it would be bunk bed. And then the wife began to throw off links to cots-houses. I want that! Their prices are quite decent. I looked, figured, read about the material. And I came to the conclusion that I could make such a bed myself and much cheaper. Made a model considering standard lumber from Leroy, wrote down the quantity and dimensions and went to buy. I work in a small firm and we have, so to speak, small room for creativity. The boss allows you to do something for yourself there, and you can borrow some tools. Therefore, I made a crib after work and on Saturdays.
Well, the work began. We mark, we saw, we plan.
We do in right place grooves.

Here we try on, we customize.

Marking the facade in place and subsequent sawing.

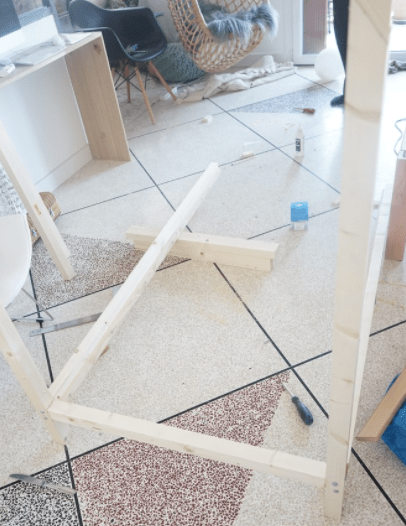
Trial assembly of the entire structure.

After that, I no longer photographed the process itself. But everything was assembled, purchased separately 2 orthopedic bases. Completed roof and stairs. There is a sunroof on the roof near the head so that it does not get hot there. Initially, a box was conceived under the crib and blanks were sawn, but so far it has not been done. Then everything was disassembled and painted. I packed everything and brought it home. At home, it took 2 evenings to assemble and this with the help of my daughter (4 years old).
The younger also periodically twisted something with a screwdriver, sometimes trying to break the coating.

Here's what happened. Looking at the result, I would change something, but in general, the children are happy (and this is the main thing!) And they sleep and play there with pleasure. The daughter still sometimes says thank you for the house and tries to help her younger brother climb to the second floor.
What I want to say. There is nothing complicated in this, you just need to want and do it. The eyes are afraid, but the hands are doing. Good luck to all!
Now, thanks to new technologies and progress, there are special small inflatable play houses or the crib is made into a small hut.
Having your own corner is very important for a child, even from a psychological point of view. Having a personal house, he learns independence and cleanliness. He develops imagination, ingenuity, a sense of responsibility.
But, unfortunately, not every family can afford to buy an inflatable or plastic house or a crib for a child. But there is a way out. After all, you can do everything with your own hands. To do this, you need a little imagination, tools, equipment, material and a few hours of free time.
Bed-house - what is it
 Please the child fabulous house every dad who is at least a little familiar with woodworking tools can. And children such "real estate" is perceived with great joy.
All children dream of having their own corner where they can drink tea with dolls, bring guests to their place and, if necessary, hide from the whole world. Therefore, it must be safe and durable. It should be remembered that the product is made for a child, so you can only use harmless products for gluing and painting parts.
Beams and boards must be well processed so that there is not a single burr. Protruding screws and other metal parts are also prohibited.
The attic can be made in the form of an additional bed. And it will be a bunk bed. The stairs to the second floor should be durable and comfortable, because it is on it that the child will climb and descend several times a day.
 It is better to keep the structure simple, without unnecessary clutter and unnecessary details, so that it can be easily kept clean.
For a child, it is enough to make the contours of the house. Walls during the game can be built using cloth, not wood. It is easier to wash or shake out the dust.
It is also worth remembering that the house is a sleeping place for the child, so it should be comfortable and promote a healthy night's sleep. It is important to ensure that the baby is spacious in it. First of all, it is a children's bed, and then only a place for games. So, summing up, what properties should a bed-house have:

Having made a house bed with your own hands, you will be sure of its 100% high quality.
Design
Before you start working, you need to clearly know what you want. It is important to have an idea of what you will do to the smallest detail. For design, you can use a pencil and paper, or use a special computer program CAD. Determine the size of the crib. It must match the size of the mattress.
It can be made on legs or it will just be a slatted bottom. If legs are provided at the crib-house, it is possible to make useful space under it to use drawers using guides or wheels. It is also nice to build an extra bed.
For those who are making a crib for the first time, the craftsmen recommend taking a solid pine beam in a 50 mm section. Boards with a cross section of 40 mm are suitable for the manufacture of the railing of the arena wall, which can be made removable.
 Be sure to carefully calculate the size of the roof and pipe. The height of the vertical supports for a crib with legs will be approximately 1300 mm, and products without them are slightly smaller - 1100 mm.
The strength of the structure depends on the material
From choice the right material depends on the strength of the bed. This should be remembered, because children love to frolic on it. Therefore, it is best to take an all-lamellar glued pine lumber. It has no knots, it has flat surface and does not require surface treatment. The disadvantage of this material is the high cost of the material.
But you can take a tree and cheaper, however, it is necessary to pay attention to the knots, resin pockets and moisture content of the material. Ordinary wooden beam sold in any hardware store, but for work it should be well prepared. Also consumption material is coming large due to irregularities and other imperfections.
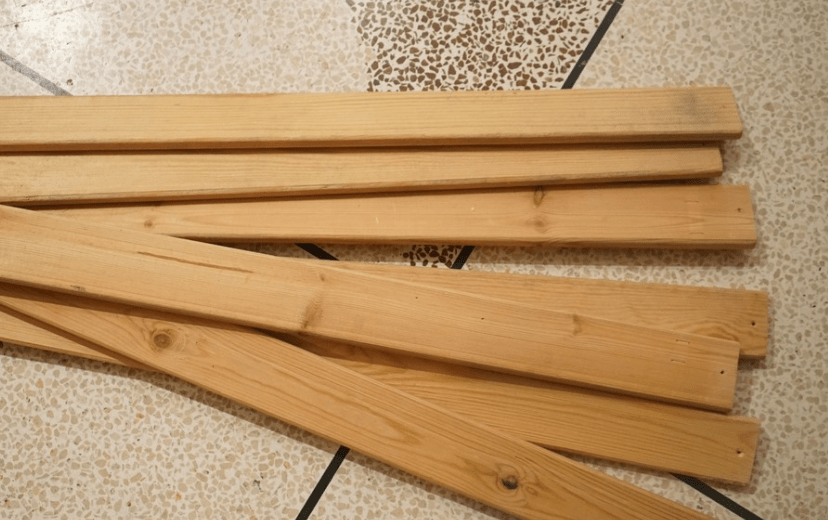
The process of preparing the tree for subsequent work
The beams are cut according to the dimensions in the project. Then using thicknesser machine all workpiece errors are removed. In the presence of knots, these places are smeared with wood putty, it also processes areas where there were resin pockets, but first they need to be processed with a chisel.
On the grinder, we go through all the workpieces, first with a tape with a grain of 120, and then a second time at 240. Now all the parts are perfectly smooth and ready for painting.
Fitting Assembly
Before assembling the product, a preliminary assembly should be done, which will show flaws. It is assembled in parts with the help of corner clamps. To do this, it is better to use confirmat 5 × 70 and a special countersink with a 5 mm drill. By using angle clamp two parts are installed, we mark the places where there should be holes and drill, then we wrap the confirmation. Do the same for the rest of the connections. The holes must be the same and not intersect.
We dismantle the bed. Sometimes, after creating holes, these places have to be treated with abrasive 240.
Painting
We cover the details with paint. Painting will be better if done with pneumatic spray gun. But before applying the first layer, the parts should be well cleaned of dust. You can use enamel or acrylic paint. Sometimes masters use polyurethane varnish. Apply two coats together with primer and leave to dry for at least 12 hours.
However, you can build a house from any children's bed by attaching an air canopy to it.
The Scandinavian style for children's rooms is gaining more and more popularity, and a do-it-yourself bed-house is a real manifestation of parental care, skill and imagination. original project a bed made taking into account the size of the room and the age of the child is beautiful, safe and economical. Adults can be sure of the reliability of the bed design, and children - in the presence of a place to relax, like the heroes of fairy tales.
There are a lot of options on how to make a bed-house. In respect of construction works more and more standard, it is important to draw up a diagram of the intended product by preparing the necessary materials.
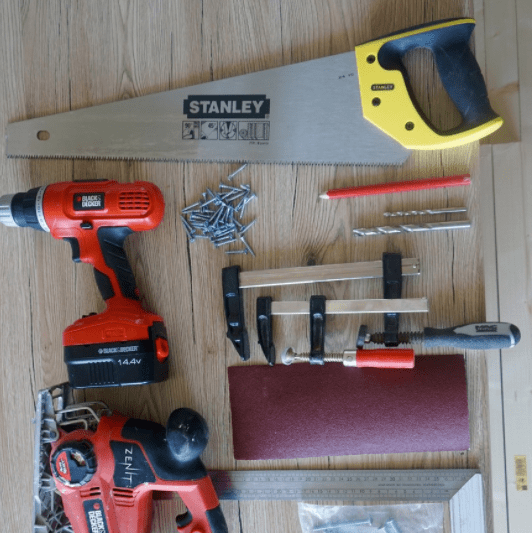
Tools
The walls of the house
First of all, drawings are made for the bed-house, using a simple pencil and a square. To build the walls of the described bed, four wooden beams are taken, each of which is 1 m 20 cm. These will be the supporting parts for the vertical structure of the bed of the house. For aesthetics gable roof, for all supports, the edge is sawn off from above to form an angle of 45 degrees.

markup

Details of the walls of the house

The edges of the supports are sawn off at an angle of 45 degrees
Roof
This part of the house bed will also require four bars and the same steps, including processing the edges at a 45 degree angle. All processed bars are assembled, while the upper ridge is attached with wood glue. The parts can also be fixed with a self-tapping screw, which should be screwed in at a distance of 3 mm from the junction of two wood parts. We advise you to follow some rules when working:
- cleaning of all sections with sandpaper is recommended;
- the self-tapping screw must be screwed in slowly so as not to delaminate the tree;
- during drilling, it is recommended to use a vice to secure the product;
- optimal modern drills and a slow process - the key to quality work.
When two planks are fixed to the two supports of the future bed, as a result, the frame of the house comes out. The repeated procedure will lead to the appearance of two equal frames - the end walls of the bed.


Gluing parts

Connection of parts

End frame fixing
To complete the manufacture of the end frame of the bed, a bar of 8.2 cm is screwed at the bottom to maintain vertical racks and stabilize the entire structure. For bed assembly, the eccentric screed of the side components is preferable. It is very important to make an accurate project for the right hit. Self-tapping screws will help to facilitate the task. The structure is also attached to simplify assembly and save time. flat corners- squares with a side of 3 cm. All accessories for the procedure are available at a hardware store.
When making this screed, drill holes in the crossbar with a 10mm drill bit. They should be on its midline, not be through and have a depth of 12.5 cm. The diagram shows how to fix their outer edges 3.5 cm from the edge of the crossbar.
A 6 mm drill helps to create a hole on the side. It is fixed exactly in the middle and falls into a recess prepared in advance. The eccentric then tightly secures the required appearance of the screw. It is possible to use and wooden parts on long self-tapping screws with pre-gluing. We should not forget only about stabilizing the connection with the help of corner brackets.

End rail fastening


Finished end frame
Collecting the basis of the design
Two thick bars are prepared, like side bed sides. Inner side the beam accommodates thin strips with the help of self-tapping screws and involves screwing screws at an equal distance from each other. These details will be the support for the frame of the future bed of the house, which will make it possible to fix the bed slatted bottom.
It is important for accurate work to make a template 6 cm in size with holes for self-tapping screws - 2.5 cm. The positions of the holes on all racks are marked with a pencil to completely match the upper edges with the crossbar. A 6 mm drill is an assistant in organizing through holes in marks. The procedure is fourfold: in this way, all the racks are connected to the sides of the bed.
Next, the hole for the eccentric is prepared on the longitudinal rack inside. Outside, long self-tapping screws are twisted, which should smoothly connect the side components of the bed and the vertical support with possible gluing of the docking point. The eccentric is inserted into the holes from below and then the bolts are tightened. Repeat the procedure to connect both frames to the sides of the bed.
After fastening the sides of the product to the ends of the bed of the house, it is supposed to fix the frame, thanks to the three longitudinal components of the roof. Three beams according to the size of the sides are attached using an eccentric or self-tapping screws and glue. When choosing the latter, the bed-house is necessarily reinforced with corner fasteners.

For assembly you will need two thick beams

Thin slats will support the frame


The frame is assembled with an eccentric coupler

Connection of side supports with crossbars
slatted bottom
The slats are screwed to flat strips, which, in turn, are fixed to the side frame sides. It is important to carry out the correct twisting to hide the screws. The inter-plank interval is obtained on average 7 cm, 13 parts go to the bottom. The remaining slats are suitable for a safety ledge assembled using corner brackets, but this is not necessary.
These slats can be borrowed from other beds. There are new types of bed slats for sale. There are also finished models that are inserted directly into the bed frame. This option is suitable for beds of standard sizes.

Rail fastening

decoration
The do-it-yourself bed-house has an indisputable plus - it includes the author's proportions, color scheme and sizes. For the boy's version, you can use a sea-colored canvas or blackout curtains for organizing a military headquarters, and for girls - decoration with flags and a canopy made of organza or tulle.
According to psychologists, it is good if children have the opportunity to have their own space during the game. So why not organize a bed-house for them?
small house - favorite place children's games until about adolescence, although numerous treehouses abroad indicate that solitude is also important for a teenager. Unfortunately, this is not an option for Russian latitudes, apparently due to long cold winters.
But when the baby grows out of his bed with a railing and begins to realize the possibility of a new bed in his life, he often wants to participate in choosing her himself. And if there is furniture store with beautiful children's furniture, boys very often choose a car bed, and girls - a house.


Varieties of bed-houses
Manufacturers are trying to diversify the models of beds-houses, so that children would be interested in them not only to sleep, but also to spend time:
- With play area. This is a two-level bed that combines the play and sleeping areas. Depending on the design, the play area can be with shelves and swings. On the second tier there is usually a playground;
- teenage. Represents convenient design with study area, bed and space for sports and games. As a rule, the roof in such a house is made of slats, and the walls are hung with fabric. The bed is placed at a height of 1.6 meters from the floor;

- princess model. Interesting design usually decorated in delicate pastel colors, ruffles and lace, with a canopy. Original bed house becomes unusual decoration children's bedroom. wooden house withstands weight up to 100-120 kg;

- universal. This model is suitable for girls and boys. Textiles in the house-bed create a false wall. The free area of the bed is filled at will with mirrors, swings, sports equipment.

How to choose a children's bed-house?
Unfortunately, not all brands responsibly and seriously perceive the desire of children to have their own "shelter" for games. The Internet is literally replete with reviews of strange, supposedly cribs made of toxic chipboard with sharp corners and rough surfaces. Of course, the question arises, what were the parents thinking when they bought this “luxury”? After all, today everyone can read reviews on cribs and choose the one that caused little criticism or has only positive characteristics!

We tried to study some reviews and made such conclusions. So, for example, some modifications of the Legend beds made in St. Petersburg have a beautiful display case, but in fact, it turns out that the furniture brought from the warehouse bad smell glue and completely made of laminated chipboard. Most reviews of this furniture contain negative characteristics.
The Austrian factory Egger has improved children's loft beds made from high-quality chipboard, and some of these "Funky Kids" are supplemented at the top with a bed, at the bottom with a work table and a multifunctional locker. Describing their beds, the manufacturers claim that they have strengthened the frames as much as possible, no longer use plastic, and have made other changes and additions.

Bed-house Kyura from Ikea - the best choice
After analyzing a hundred or two Internet pages, we came to the conclusion that the most popular among consumers is the Kyura bed-house from Ikea. It is made of natural high-quality processed pine, has no protruding sharp corners, like many products from Ikea, has the ability to transform, and appearance reminds two-story house without a roof. But the manufacturers also came up with a roof! It is an awning stretched over arcs made of washable fabric. There is also an awning option in the form of a house. A sleeping place, at the request of the owners, can be equipped on the first floor, and a house under an awning - on the second. You can do the opposite. Both options are popular with kids.
Many who have bought a house bed from Ikea have improved the product by providing it with fabric "walls" with windows cut into it. Awning and mattress are purchased separately and have standard sizes which is convenient to buy bed linen. Up to six years, the child can sleep, being fenced with bumpers, after six, part of the bumpers can be removed. Some argue that the crib can be used until the age of ten or twelve, if the child understands that the structures are not designed to jump on it.


What should be the bed-house?
Many loving parents, not trusting the manufacturers too much, make bed-houses on their own, acquiring solid wood for this and using either light slats and bars for decorative and functional elements, or carefully rounded fragments. Fathers who love and know how to make things make entire palaces of princesses or fairy-tale huts. Such "real estate" is perceived by children with great enthusiasm.

A child's dream - a cozy house with windows and the possibility of dolls and toy animals living in it - must be absolutely durable and safe for the child and for the mother, who regularly covers fresh linen, wipes dust, and washes dirty surfaces. In its manufacture, toxic glues and dyes should not be used. All surfaces must be carefully treated. Otherwise, splinters and burrs cannot be avoided. No protruding screws or the like metal parts must not be! The child must confidently grab the ladder if he has to climb to the second floor. And if the stairs lead to the first floor, it should be as comfortable as possible. There should not be any unnecessary details that clutter up the space and contribute to unnecessary accumulations of dust.

Those craftsmen who make the house spacious enough act wisely, making only hints-contours of the roof from natural laths. Having hung the “walls” with a cloth for the duration of the game, the children will play in such a house, and when cleaning is required, the cloth can be easily removed, and the walls of the house do not cause a huge number of bumps on the head and bruises on the body.

Experts recommend, when choosing children's beds "attic", "teremok", "house", to dwell on those options where the bed is a full-fledged place for a night's rest, and not an auxiliary folding sofa. The bed should not be cramped. For its manufacture must be used natural materials. If the nursery space allows, the bed should, first of all, fulfill its main purpose. The house can be made independently from almost any children's bed, providing it with a light canopy that is easy to wash.

You should not save on a mattress, choosing it according to the weight of the child. If the main conditions and wishes of the "little master" or "lady" are met, be sure that children's house will give its owners a lot of positive emotions!

Children's bed house. Photo


We move the children to the nursery, we first planned to buy a ready-made bed, but we couldn’t choose until we got an online store with beds-houses. I caught fire like this, but it’s expensive to buy (from 50k), and, taking into account my own nuances, I decided to do it myself. Everything was bought in Leroy, everything came out at a price of about 10,000 rubles (+ 8,000 for trimming and a grinder). Net time days 7.
The project was drawn in visio. I did cutting and grinding in an apartment without repair, assembled and painted at home. Acrylic paint on water, almost no smell. Assembly for confirmations, then covered with facades on furniture bolts. All holes were filled and painted. Colored colors for multi-colored planks.
In total, if there is time and place, it is not very difficult. Children are happy, they moved with pleasure :)
We begin to assemble the tool table. Of the tools: trimming, an eccentric grinder, a manual milling cutter, a hand saw, a square, 4 small clamps, a screwdriver, which is also a drill.

Homemade milling table. Frazier borrowed. The table is old for repair, it's not a pity.
In general, all the boards were with a factory rounding - chamfer. But there are no bars, I had to chamfer in this way.

Tortsovka thing!

The most hemorrhoid grinding turned out to be. Don't start without a grinder. And do not a residential apartment. Tiny dust everywhere.


Wallpaper, you can decorate them.

Frame assembly. Bar 50x50. For confirmations.

Facades on furniture bolts.


Painting with a velor roller White color in 3 layers.


The base color is ready. Later, he cut out another window, removing 4 boards.

The size of the lower bed is 90x200, another 20 cm near the wall in the form of a shelf for pillows. Thus, the lower part is extended by 20 cm, when you sit down you do not hit your head. From the bottom base to the top 110 cm.

The staircase was made specifically from the inside so that it does not take up space in the room, there is not much of it anyway. The size of the upper bed is 90x160. From the new for myself, I discovered that it is extremely easy to make a children's ladder, a bar, a feather and a round profile on PVA.

Then the self-tapping screws were puttied and painted separately, so that in the final everything is fine.

The final - back wall from 12mm plywood covered with wallpaper. Ikea shelves have been waiting in the wings for a long time. Illumination is temporary (for a long time), I will finish it. You can sit on the bed like on the sofa, just put more pillows.
