Most recently, I wrote about a great program for storing passwords and various data - Password Box. However, then I do not have the full version, and this was the main reason why I abandoned this program.
Having downloaded Password Box to all my devices running iOS, Android and Windows, I began entering data that required storage. And now, I have the opportunity to update the previous article.
What I liked about Password Box was the automatic password saving feature. No, this is not the kind of memorization that any browser supports. When you visit any page, if you are logged in, Password Box offers to save this data. Many may say that there is nothing like that here; many programs do this. This is not entirely true. In other programs, you need to fill out a form, and only then the program will save the data. Password Box pulls out the data without having to fill out a form.
To be fair, it should be said that this only happens on unsecured sites. If the site is protected, you must fill out the form.
However, this method in Password Box also has disadvantages. If you are not logged in, but your data is stored in the browser, Password Box clears the fields, thereby forcing you to enter the data again in order to save it. Simply put, you saved your login and password on some page. When you access this page, the browser automatically fills in the login and password fields to enter, and you just have to press enter. In some options, I don’t understand what it depends on, Password Box clears these fields, prompting you to enter data.
A huge advantage of Password Box is that you no longer need to manually fill in the fields. You just need to go through your sites, and Password Box will automatically save the data. I collected access to 72 sites in 30 minutes. Now imagine how much time it will take to fill out this data in other programs.
After Password Box saves your data, getting to the pages that are filled out in the program, Password Box will automatically authorize you on these pages. You don't even need to press enter.
However, these properties also have their disadvantages. For example, I had a hard time adding 3 of my blogs, which are on different subdomains, to the Password Box. When you enter a page, Password Box saves your password; if you go to another page that is on a subdomain, Password Box tries to insert the same data. This is very inconvenient if sites are located on different subdomains within the same domain, or in affiliate programs where the affiliate program has data other than account access and is located on a subdomain. Of course, in the settings of this template in the Password Box it is possible to check the box “Use only on this subdomain”, however, entering the data itself causes difficulties. Then, when all the data is there and the box is checked, Password Box itself will decide on which subdomain what login and password are on.
But Password Box is very convenient when creating new accounts. When you go to the password form, Password Box automatically generates a password, depending on the settings of the password generator.
One template can store N number of accounts. For example, you have 3 accounts on one site, then by clicking on the site icon in the Password Box you will be asked which login you want to log in under. This eliminates the need for one site to have a bunch of templates with registration data.
By the way, interestingly, the Password Box is displayed differently on iOS, Android and Windows. For example, on one device there may be one card with three logins, on another there will be three different cards.
Password Box Allows you to store data from bank cards, passports and other documents. What can I say about this? The Password Box in the templates of these documents does not have some important forms. The strangest thing is that the bank card template does not have a PIN form. The passport template also lacks some forms.
I didn’t quite understand the meaning of the encrypted notes. Nowadays, most note-taking programs encrypt them. Therefore, there is no point in using the program for these purposes. I thought about using these notes to store data for which there are no templates in Password Box, however, I realized that storing data from registering programs or accessing an access point in notes is not convenient.
As a result, Password Box is a program that automatically stores passwords, automatically authorizes, and generates a password upon registration. It is not suitable for me as a storage of registration data. However, Password Box has proven to be very convenient, and I now consider its features well worth the $12 per year. Of course, I will continue to look for a storage program, but in any case, Password Box will live on my devices. In addition, it is much easier to pull out data from their program than to climb websites and copy your login and password. And perhaps, I would like to hope so, in one of the updates the necessary templates will appear, and if not templates, then the ability to edit them.
The Internet today occupies an important place in the life of any person. As a rule, for full-fledged work or simply to use resources, registration is required, which implies password usage. Passwords are also required to pay various bills, confirm actions, etc. The resource for which a password is created can be either important (Internet banking, for example) or not very important (if it gets hacked, no big deal). Simple password Not suitable for sites storing funds. Let's look further at how to come up with a strong, correct password that won't be hacked.
So, few people guess passwords today - as a rule, brute force is used. Using a special program, various combination options are sorted out. The first combinations to be checked are sets like “111111”, “123456”, “qwerty”, etc. Next, a simple substitution is made. Such a program can sort through a huge number of different combinations in the shortest possible time.
If the password is your date of birth or just a set of numbers, for example "25061980", the program will decrypt it in 2 seconds. On personalized passwords, which begin with a small letter (olga, roman) are cracked in 4 seconds. It will take approximately 4 minutes to password decryption, which capitalizes names. A complex combination like “1d2d3s4a8c” will require 4 days to decrypt, a password like “HSU5-BHJDa” will take 12 years, but the program will recognize such a password “IkRn%Kmbl253NNp” only in a million years, that is, never.

In the way that come up with the correct password, you must adhere to the following basic rules:
1. Passwords should not be short. At least 8 characters, preferably 10 or more.
2. It is imperative to use both numbers and letters. Even better is to dilute the combination with symbols and punctuation marks.
3. Correct password must contain both uppercase and lowercase letters.
It is worth noting that password is hacked not just the program. This can be done manually if you know enough about the person. For example, butfors will be about 100 thousand years recognize password"ivanovkostya". But if you have knowledge about a person, you can select a password manually in an hour or two. Moreover, last name, first name, date of birth are usually checked first.
Another way find out the password- is to choose the answer to the “secret question”. Just click on the "Forgot your password?" button. and in a few seconds (if you have information about the person) select a security question. Usually they use primitive data that is really easy to find: mother’s maiden name, favorite dish, animal name, etc.
Where do attackers get information? The answer is very logical and lies in an accessible plane: usually on social networks. If the attacker has set himself a goal crack password, he can freely use information from social networks. Therefore, Vanya Ivanov, who uses the password “ivanivanov” to log into the social network, should definitely change it immediately, otherwise his friends will very quickly see an incredible amount of spam on his behalf. Thus, password hacking- it's not as difficult as it might seem.
Now let's look at what needs to be done to correct password was selected as efficiently as possible (taking into account the previously specified requirements):
1. You should not use personal information in your password: date of birth, wedding, phone numbers, etc.
2. The answer to the “secret question” should not be simple and easy to guess. There is no need to use information that is easy to find out.
Password generation and methods of remembering.
To select the correct password quite usable password generation. This service is very affordable. You can effortlessly pick up a combination that is not easy to recognize. However, there is one pitfall here: a complex combination is difficult to remember. Rare combinations are difficult to remember. Let's look further at how to make sure you don't forget or lose your password.

In most cases, when password generation the same combination is used. Sometimes the password is updated and comes out something like "parol1", "parol2", etc. This is a tricky step, but you can be sure that the password will not be forgotten.
When using a password generator, the result is a meaningless and illogical set of characters. It needs to be stored somewhere. It’s interesting that many people have the habit of writing it down on a piece of paper and sticking it on the monitor. For example, in an office where there are many employees, clients and random people. With the same success, you can create a file on your desktop called “my passwords”. The effect will be the same.
So, here are some general tips for storing and remembering passwords:
1. It is better to create a new unique password for each resource.
2. There is no need to store password combinations on your computer desktop - hackers can easily break into your PC.
3. The password does not need to be kept in plain sight.
4. If the password is written down on a piece of paper, you need to create a copy of it.
5. No need to enter passwords in “strange” or suspicious sites or programs. Portal administrations never require you to provide them with a password - it is used only for login.
6. If a special program is used to store passwords, you need to create a copy of it.
And finally, about the correct password.
Finally, some useful tips. In gaming clubs or internet cafes, enter passwords as rarely as possible. These are other people's computers, so so-called spyware can be used: they easily remember combinations that are entered from the keyboard.
If you still had to log in from someone else’s computer or use password not only at home, but also at work or in another place, always log out of the resource (don’t just close the tab, but click “Exit”) and do not click “Remember me”. Otherwise, anyone can come in even without password guessing. It’s unfortunate, but even serious electronic fund exchange portals are famous for this: they have a “Remember” function, although it shouldn’t exist, and the session should be limited.
Passwords sometimes need to be changed. True, the more reliable it is, the less often it needs to be changed. A password of 12 - 14 characters can be changed every few years.
Using all the recommendations in this article, you can easily create correct password, which no one can hack. As a rule, in the old fashioned way, passwords are written down in notebooks - in this case, notebooks should not be accessible to a wide range of people. Over time, you can remember even a large and complex combination - depending on how often you work with it.
The point of such mobile gadgets, which are fashionable today, is partly that they can access the necessary resource anywhere there is an Internet connection. At the same time, there is no need to go to an Internet cafe or club, where they can easily scan password. But you should also log out of your account for security reasons. In general, these simple recommendations can completely protect against password hacking.
Password Safe is an excellent password manager for the Windows platform. It can effectively save time, effort and privacy of your data.
As you can see, the increasing complexity and diversity of our digital lives and the growing threat from malware (viruses, Trojans, spyware) are creating real problems associated with the need to use complex passwords, which in most cases are difficult to remember in large quantities, without writing them down on scraps of paper, into text files and so on.
Using some kind of password organization and management tool is the only suitable solution to the problem. A good password manager, and Password Safe is just that, copes with the problem of remembering hundreds of strong passwords in no time, and allows you to conveniently and safely store all passwords in one safe place for all our pages with authorization on various sites (social networks, mail, games, Internet -shops, etc.).
Password Safe was created by Bruce Schneier and Counterpane Labs for Windows users. This program is free, and I’m especially pleased that it has a Russian-language interface. To download it, click on the link:
Password Safe allows you to conveniently manage your passwords by easily and quickly creating, saving, organizing, autofilling passwords into authorization forms using a password policy. Creating and saving your usernames and passwords is just a few clicks away.
Program installation
The installation process for the program is simple, and most users do not need to select custom configuration options during installation. You may wish to change the "Installation Type" during installation, and in some cases the user may wish to use the "Portable" option, which allows the use of a separate USB Flash device to store passwords, rather than using the Windows Registry. In most cases, you can get by with the standard installation option.


When you open Password Safe, the Password for container window appears with fields that can be used to access previously created passwords. If the program is opened for the first time, then there is no password database yet; you need to create it. To start this process you need to click on the button:
New container

You will be presented with a dialog box asking you to choose a name for the new password database.

I recommend changing the path where this password database will be saved. By default, this is drive C, it is advisable to specify a non-system drive, let it be drive D, F or G, as in my case. After entering the name and specifying the new location, click on the button:
The Set Container Password dialog box appears. Create a strong password that will consist of letters, numbers and other symbols. In other words, the more complex the password, the more secure your password database will be.
Where to save this one password for all other passwords? You need to decide this yourself. If you want, hide it in a text file under an inconspicuous name, or write it down on a piece of paper and put it away in the desk. The main thing is not to lose it, otherwise access to your passwords will be irretrievably lost.
After entering your password, click on the button:

If, when entering a password, the Password Safe program warns you that you are entering a simple password, then you should heed the advice and set something more complex.

After entering the password for the password database, a window will open with a row of buttons located at the top and an empty white area that represents the password database itself, which is currently empty. Active program menu buttons are bright, inactive ones are gray. To get a hint about what commands a particular button performs, hover your mouse cursor over it.

After the Password Safe password manager has been installed, a password database has been created (it is still empty) and a password has been assigned to it, all that remains is to enter all the passwords into it, organize them into categories and learn how to use this manager effectively.
Entering and organizing passwords in Password Safe
Click on the button that looks like a sheet with a green circle in the lower right corner:
Add element

Before creating your first password in your first database, you must set a password generation policy. To do this, click on:
Password Policy
By default, random password data generation is simplified and does not generate strong passwords. Considering that the whole point of using a password manager is to create strong passwords and to save the user the headache of remembering them and entering them into the authorization form, it is advisable to change the default settings for reliability.
By default, Password Safe generates an eight-character password, which is extremely insufficient for solving security problems. To correct this flaw, you need to take three simple steps:
- Select Override Policy;
- Set the password length to at least 20;
- Turn on the Symbols flag.

Now go back to the tab:
Basic
In it you can create a new password according to the newly configured policy.
Password Safe is convenient because it organizes passwords according to a simple hierarchical principle, which allows the user to classify them into name groups, for example, passwords for mail, online stores, social networks, game servers, etc.

To set up a group, enter the group name in the field:
Group
Set the title in the field:
Heading
It allows you to determine what the password refers to. It is advisable to use a term that will be easily recognizable in relation to what the password belongs to, for example, “Mail” if this element will store the password to your Mail.ru email account.
Username and Password
Create
Insert into this field a link to the authorization page for this resource, for example, the authorization form on the mail.ru website is on the main page, so you can specify a link to the main page http://mail.ru. This allows you to go to this resource in a couple of clicks and automate the process of entering data into the form. How to organize this will be described below.
Email and Notes
These fields are not required. You can add additional information to your notes, for example, the answer to a security question, etc.
In general, it’s a good idea to use the automatic password generation button, thanks to the previously overridden password creation policy, the output is a good, crypto-resistant password, which will take a lot of time to crack.
Unfortunately, many authorization systems do not check the level of password strength, which leads to the fact that users are limited to the simplest combinations, familiar and easy to enter. And this is evil. In another couple of years, password requirements will increase and become mandatory. Passwords made from letters and numbers will forever go out of use, and 20-character passwords will become commonplace, and password managers will become a necessity.
After all the required fields have been filled in, all you have to do is click on the button:


The first element for logging into the mail.ru mail service has been created. In the same way, you can set elements with strong passwords for Yandex Mail, Gmail, etc. Create groups and place elements in them for authorization to any web resources.
Automation of the process of entering login and password into the form
It remains to automate the process of entering data (login and password) stored in the Password Safe manager. To do this, open the tab:
Control

And select the tab:
Miscellaneous

In the autodial section, you need to correct the autodial string, which is set by default:
Where u is the Login or Name field, t is the tab character that moves the cursor to the next field, p is the password field and n is carriage return to a new line (enter button). With this standard layout, autofill does not work on most forms. Something needs to be added, namely another tab character t, the resulting line will be like this:
Autofill is now available for most forms.

In order to use it, go to the authorization page; to do this, in the Password Safe program, click on the Follow the link button, which looks like a globe. The program will open the link that is specified in this element, in my case it is:

place the mouse cursor in the Name (login) field on the authorization page that opens and in the main window of the Password Safe program select the element:
Autodial

After which the login and password will be automatically entered into the form fields. You don't have to do anything, Password Safe will do everything for you. Isn't this happiness!

There is another more interesting way to open a page and enter login data into it on autopilot. To do this, in the main window of the Password Safe program, select an element and call:
context menu
right-click, in the window that opens, select the command:

If you do not use autodialer, you can simply click on an element in the Password Safe program and the password will automatically be placed on the clipboard. Now all that remains is to paste it into the Password field in the authorization form.
If you want to change the password or set other parameters for an element, then select the command in the context menu:

The program will open a window that is already familiar to you.
To summarize the above, I would like to say that the use of such programs significantly saves time on routine actions that millions of people do every day in front of their monitor screens.
Password Safe is a convenient tool that is easy to use, as reliable as a Bastion safe, smart as a professor, has a Russian interface and is free.
We've covered the most commonly used commands that you need to know to work with this program, but if you want to know more, then check out the Password Safe help for more information.
Any user who cares about the safety of their data probably has several passwords that they use on various web resources. Many people use a simple password for unimportant sites and complex passwords for important resources. But sooner or later the question arises: where to store all the passwords? For this purpose, some people use a text file, but for many, a simple piece of paper is enough. We suggest considering another password management program called Password Box, which allows you to store a list of passwords and additional data.
When you first launch Password Box, it is strongly recommended that you set a personal password to log into the program. This will protect your data and eliminate the possibility of unauthorized persons viewing the list of our passwords. To set a password, just click in the field with the red inscription Password not set. It is advisable to come up with a complex password using letters and numbers.
On the left in the password manager window we see a list of categories where passwords are most often required, including bank cards, web accounts, computers, websites, payment systems, social networks, devices, forums, email, etc. When selecting a category on the right, we we see a list of entries and passwords for them. Detailed information about the selected entry is displayed below.

In Password Box, several of the most famous sites are already predefined for each category. You can delete this data manually or create a new file in the menu File – New File. When creating, select the necessary categories and one of the encryption methods: AES, DES, 3DES, RC2, RC4, Blowfish. Here you can specify the location and name of the file with all our passwords.

Now let's look at the process of managing passwords, or rather adding passwords to the list. First of all, select a category in the list, then enter the data on the right. The required fields may vary depending on the selected category. For example, in relation to a web account, you need to indicate the name of the resource, link, username, password and e-mail with which the account was registered. If you enable a checkbox in the password field, symbols will be displayed instead of asterisks. Having entered all the entry data, press the button [Apply] and the entry is saved in the list.

To add another password entry to the Password Box, click the button below the list [Insert]. There are also tools for deleting records and moving through records. Button [Change] is intended for changing the fields of the detail panel. Here we can change the order of the fields, remove or add new fields from the available ones.

The Password Box developers have provided the ability to add your own fields to the password table. Just press a button [New field] and indicate its type and name. From this moment on, a new column will appear in the table, and a new field will appear in the detail panel, into which you can enter the relevant data.

By the way, let’s note a useful function in the program. Button [Generate] opens a window where we can create a password from random characters. Password Box also allows you to select characters in sets and customize the password length. This feature will be very useful when we first register on a website and come up with a password for ourselves.

Let us note one more convenient point. Password Box stores the history of password changes. We can always remember what the password was before by simply opening the drop-down list in the password field in the detail panel. The passwords are listed here, and the dates they were changed are listed there.

Finally, let’s look at a few more options for managing passwords. When the list of saved passwords grows, you will come to the rescue search. To display password symbols instead of asterisks in the table, click the button [Show password text]. The list of categories can be changed at your discretion - add categories, delete, rename, move, change the icon, add subcategories.
Characteristics:
Interface language: Russian, English, etc.
OS: Windows XP, Vista, 7
File size: 2.9 MB
License: 60-day evaluation, registration $29
Link:
Due to numerous requests from readers, I decided to write detailed and simple instructions, how to reset a user account password in any version of Windows: 10, 8.1, 8, 7, XP.
So, you turned on the computer, and the system asks you to enter a password to log in. You enter the user's password, but it does not match: the “invalid password” error appears. What to do if no password is suitable, but you need to log in? There is a solution - you can reset the password using a special program recorded on a bootable USB flash drive. Now I’ll tell you how to create such a flash drive. 
You will need to briefly use any others computer. To do this, you can contact a relative, friend, neighbor, maybe you have a computer at work - I think this is not a problem now.
So, we sit down at another computer or laptop. Insert any flash drive into it:

Download a free program for resetting Windows passwords -. You can download it from the official website (or from my Yandex.Disk): 
Run the downloaded file lsrmphdsetup.exe:Install the program as usual: i.e. We agree with everything and press the ““ button in all windows. Next" In the last installation window, click the “ Finish” – the program will start automatically and its shortcut will be created on the desktop: 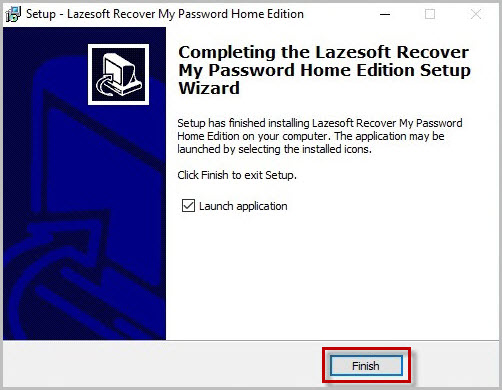
In the start window, click the button Burn Bootable CD/USB Disk Now!(“Burn a bootable CD/USB disk right now”): 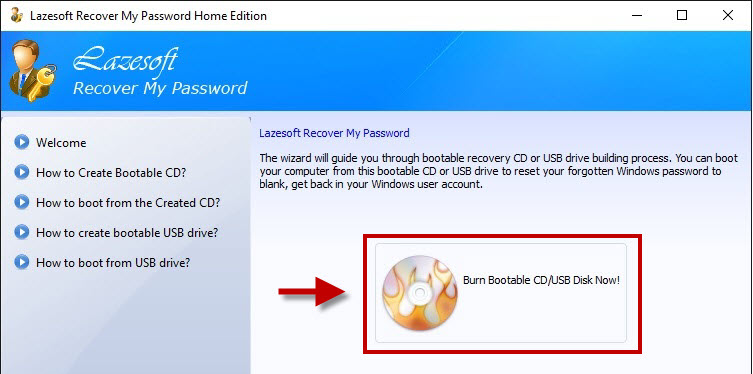
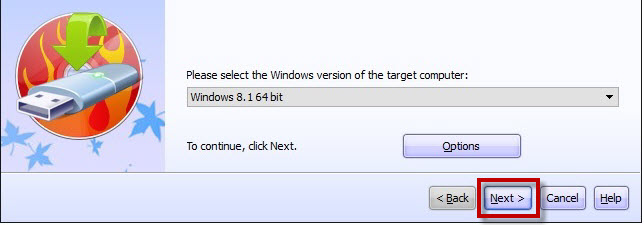
In the next window select Windows version, which is installed on the computer where we will then reset the password. Not on the list Windows 10, but it’s not scary: if you have a “ten”, then choose here Windows 8.1 with your bit depth.
By the way, on one of the forums I saw a message that you can create a bootable USB flash drive with Windows 8.1 64-bit, and it will be suitable for resetting the password on any version of Windows (I checked on Windows 10 64-bit and on Windows 7 64-bit - so and is): 
After you have selected the desired version of Windows, click the “ Next”:
In the next window, place a marker on the item USB Flash and select the letter of our flash drive (it is already inserted into the computer). In my case, the letter of the flash drive: F.
Then press the button “ Start”: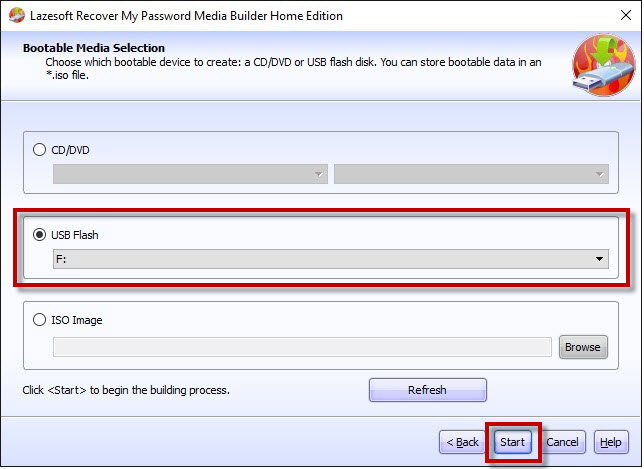
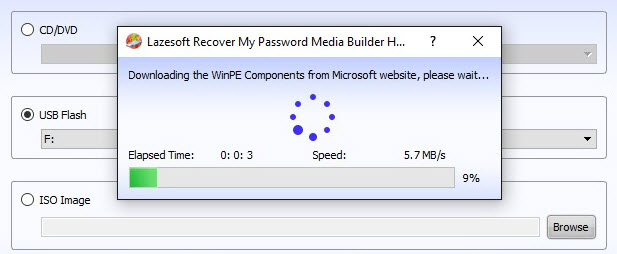
The program will download the necessary components from the Microsoft website for some time:
After this the program will ask: “ Should you format your USB drive now?“All files, if they are on the flash drive, will be deleted. Press the button “ Yes”:
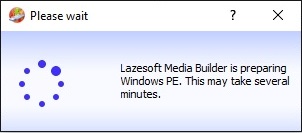
Now we wait until the bootable USB flash drive is created:

At the end of the process, press the button “ Finish”:
 All! The bootable USB flash drive with the password reset program is ready. We take it out and take it to our computer.
Insert the bootable USB flash drive into your computer. And now comes the most important, and at the same time, the most difficult moment for those who will be doing this for the first time. We need configure the computer to boot from our flash drive .
Those who know how to boot a computer from a flash drive can go straight to the end of this article. For those who don’t know how to boot from a flash drive, I’ll try to explain as clearly as possible:
============================================================================================
In order to “force” the computer to boot not as usual (i.e. from the hard drive), but from the device we need (in our case, from a flash drive), we need to enable a certain setting in Bios computer.
To get into this very Bios, we must immediately after turning on the computer press a certain key on the keyboard (and press not just once, but many, many times until we see the BIOS on the screen).
This key is different on different computers and laptops:
- The most commonly used key is Delete(or Del ).
- You can also often call up the BIOS using the key F2(and on some laptops Fn+F2 ).
- Keys are used less frequently Esc, F1, F6 and others.
In general, immediately after you press the Power button on your computer or laptop, do not wait for Windows to start loading, but immediately start pressing the key many times Delete on keyboard. After a few seconds (5-10) you should see Bios.
If nothing like this appears, and your Windows starts loading as usual, then we don’t wait for anything else: we restart our computer again (you can directly use the Reset button) and try pressing another key many times - F2.
If you don’t get into the BIOS again, reboot the computer again and try pressing the next key - Esc. After F6 etc. But hopefully you won't have to experiment for so long: in the vast majority of cases, either the Delete or F2 key works.
By the way, a hint about which key to load the BIOS usually flashes at the bottom of the screen immediately after turning on the computer. But for some reason no one looks at her, or does not have time to look at her.
On different computers Bios different, and it looks different for everyone.
For example, on my computer it looks like this: 
On another computer it will be like this: 
On the third computer it’s like this:  That is, I say this because it is almost impossible to write separate instructions for each Bios.
The main thing that anyone who needs to configure booting from a flash drive should know: in the BIOS (no matter how it looks like for you) you need to find the section where the word is present Boot(from English “Loading”). By using the arrows on the keyboard to navigate to this section, we set it to first place in the list of boot devices flash drive.
In Bios, the flash drive may be displayed with its own name (for example, Transcend), or as USB-HDD; There are other options. One thing is important: it must be selected as the first device from which the computer will boot.
Usually the flash drive is “raised” to first place using the arrows on the keyboard, or the keys +/- , or F5/F6.
Having set the setting we need in Bios, we must leave it, not forgetting to save the changes made. To do this you need to go to the section Exit(it’s usually the last one) – and there select the item “ Save and Exit” (“Save and Exit”). And then confirm once again that we are leaving by clicking “ Yes”.
That's all: if you did everything correctly, the computer will reboot and boot from the flash drive (press the Delete key again, or F2, or something else - no need!).
Many people don’t even want to bother creating a bootable flash drive with any software, because... They are afraid that they still won’t be able to configure the computer to boot from it. I tried to describe this entire process of booting from a flash drive in as much detail as possible. If you have mastered this text, I hope it has become at least a little clearer and now all that remains is to practice.
===============================================================================================================
So, I created a bootable USB flash drive with a password reset program on another computer. I insert this flash drive into my computer and turn it on.
Immediately I press the key many, many times Delete on keyboard. After a few seconds I get into Bios.
Using the arrows on the keyboard, I go to the section Boot(although in my Bios you can work with the mouse - in older versions of Bios this will not work).
Here my first device now is HDD(ACHI PO: WDC WD50...):  I select this line using the arrow on the keyboard and press the key Enter. A list of devices from which you can boot opens. In my case, this is a hard drive and my flash drive (it is listed here twice). We raise to the first place in the list - flash drive(if there is a choice: USB or UEFI, then choose UEFI). We do this using the arrows on the keyboard or keys +/-
, or F5/F6:
I select this line using the arrow on the keyboard and press the key Enter. A list of devices from which you can boot opens. In my case, this is a hard drive and my flash drive (it is listed here twice). We raise to the first place in the list - flash drive(if there is a choice: USB or UEFI, then choose UEFI). We do this using the arrows on the keyboard or keys +/-
, or F5/F6: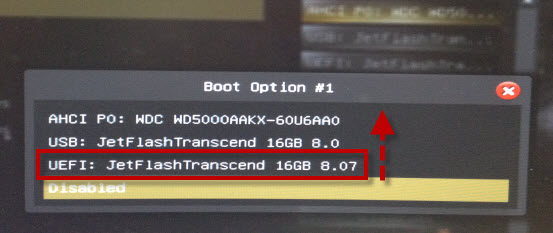
Now the flash drive is in first place in the list of boot devices: 
Now we exit here, saving the changes. To do this, move the arrow on the keyboard to the last section Exit. Select the line Save Changes and Exit- press the key Enter:
Then select Yes:
After a while, a menu opens in which, using the key Enter we select an item Lazesoft Live CD:
Wait while it downloads: 
In the next window, check that the item is selected Reset Windows Password(“Reset Windows Password”) and press the button Next:
A window will pop up with a message about non-commercial use of the program - click Yes:
Click again Next:
In the next window highlight the username, whose password will be reset and click Next:
Click on the button RESET/UNLOCK:
The password has been successfully reset - click OK. Then Finish:
We go to “ Start” and press Reboot Computer("To restart a computer"): 
Click OK:
After the computer restarts, we can login to windows without password!
