In order to distribute the Internet via wi-fi, you need a router - a special device. But in most cases, especially at home, you can not even buy it, but turn any computer into a router. All that is required for this is a computer with a built-in or external wi-fi adapter and a small Virtual Router Plus program - a free virtual router.
Thanks to a virtual router, you can distribute wi-fi to all devices in the nearest area - computers, laptops, tablets, smartphones, to everything that can receive a signal.
Virtual Router Plus - free virtual router
Virtual Router Plus is a free virtual router in Russian. Thanks to him, any computer with a wi-fi adapter can distribute the Internet to other devices that can receive a wi-fi signal.
Virtual Router Plus is lightweight, easy to use, intuitive interface, stable, and does not load the system. This is one of the simplest and most understandable programs for creating a wi-fi point on a computer.
Virtual Router Plus Interface
When you run this program, a window will open in front of you. You need to fill in the following data:
- Network name (SSID). Write down the name of your wi-fi network. I do not recommend using Cyrillic.
- Password. Create a password to prevent neighbors from stealing your internet.
- General connection. Select the Internet connection in the list that you want to distribute through this virtual router. If the required connection is not in the list, then click on the "Update" button next to it.
When all the data is filled in, click on the "Launch virtual router plus" button. When wi-fi starts to be distributed, you will see a message in the system tray. After that, you can try to catch the Internet with a variety of devices.
The free virtual router Virtual Router Plus can distribute any Internet connections, regardless of their method: through a network card from an ADSL modem, USB ADSL modem, USB 3G / 4G modem, fiber optic technology and others.
Yes, the operating system will let you find and connect to nearby networks, but what about add-ons? What if you need to have detailed information on all the Wi-Fi networks around you, need to fix problems with your network, turn your laptop into a portable Wi-Fi hotspot, or stay safe in public hotspots? Windows won't help you with all of this.
That's why we've found six apps for you. They do everything Windows can't and more. Five of the six apps are free, while the sixth is not expensive at all.
From MetaGeek is an excellent tool for searching and collecting information on Wi-Fi networks in the area where your computer is located. The program is also useful in solving problems with your own Wi-Fi network.
For all found Wi-Fi networks, InSSIDer shows the MAC address of the router, the manufacturer of the router (if the program can determine it - usually it can), the channel in use, the SSID or public name of the network, security type, network speed, and the like. In addition, the program shows the current signal strength of the network.
How would you use the program to solve problems with your wireless network? If you see that a nearby network with a strong signal is on the same channel as you, you would change the channel of your network (most routers allow this) to avoid potential conflicts.
The program also allows you to identify "dead zones" in your area, where there is no sufficiently reliable Wi-Fi signal. To do this, just walk around your home or office with InSSIDer turned on. In the future, you can either avoid these places or try to rearrange your router.
Whether you're looking to fix problems with your network or find Wi-Fi hotspots to connect to, InSSIDer is the program you'll want to download and try out.
Price: Free
Compatibility: Windows XP, Vista and 7 (32-bit and 64-bit)
Download InSSIDer
Here's another great program for finding Wi-Fi networks and providing information about them, like how far away they are from you. The radar-like screen shows all nearby hot spots. A separate panel offers detailed information on all found hotspots, including signal strength, network type (for example, 802.11n), router manufacturer, transmission channel, etc.

Next to the radar, the panel provides even more detailed information about the network you are currently connected to, including your personal IP address, external IP address, DNS, gateway information, and more.
Why use Xirrus Wi-Fi Inspector over MetaGeek InSSIDer? For example, because the simpler and more understandable layout of Wi-Fi Inspector simplifies the presentation of information on hot spots. The program also shows the relative physical distance of you from the hot spot. And, probably, no one will deny the usefulness of the radar itself.
However, InSSIDer is better than Xirrus Wi-Fi Inspector in terms of getting more detailed information about surrounding Wi-Fi networks.
Price: Free
Compatibility: Windows XP SP2+, Vista and 7
Download Xirrus WiFi Inspector
is a great, free program that allows you to turn a Windows 7 computer (the program only works with Windows 7) into a Wi-Fi hotspot, which can then be used by nearby devices - like a smartphone, or colleagues' tablets.
Of course, the computer itself, which you would like to turn into a Wi-Fi hotspot, must be connected to the Internet and support Wi-Fi. At the same time, the Internet connection does not have to be wired at all (although it does not hurt), because the computer's Wi-Fi card can perform a dual function - on the one hand, act as a Wi-Fi receiver, and on the other, as a transmitter.
Setting up a hotspot is simple: once connected to the Internet, launch Connectify, give your hotspot a name, and set a password. After that, your computer's Wi-Fi card will start broadcasting a Wi-Fi signal that other devices can connect to. It is worth noting that your computer will work on the Wi-Fi protocol under which it was created. In addition, it will also support older protocols. So, for example, the 802.11n signal will allow you to connect devices with 802.11b/g/n.

Setting a password will restrict access to the Internet by strangers. The hotspot signal itself is protected by WPA2-PSK encryption.
You can even use Connectify to set up a local network without an external Internet connection. Run the program as a hotspot and nearby devices will be able to connect to its network, even if you don't have Internet access. This can be used, for example, to transfer files within a workgroup or for multiplayer games.
It's worth noting that connecting my Mac to a hotspot based on a Windows 7 computer and Connectify caused me problems. However, other computers and devices connected without problems.
Free program for changing network settings. The program is intended for non-commercial use and in the free version allows you to create up to six profiles containing different network configurations.
Changing the created profiles in NetSetMan (short for Network Settings Manager) is very easy - just select the tab with the desired settings and click the "Apply" button.
You make the necessary settings in advance in separate profiles, and then simply switch to the one you need when changing the connection method!
Key Features
NetSetMan allows you to change:
IP- the address of the computer on the Internet.DNS- a system that associates domains with IP addresses.
hosts- a text file with instructions for forwarding.
- IP addresses;
- DNS, WINS and SMTP servers;
- name and working group of the computer;
- Wi-Fi settings;
- network printers;
- entries in the Hosts file;
- some system properties (monitor mode, sound devices, and power configuration).
In addition, NetSetMan can execute any BAT, JS or VB scripts, which allows you to change almost any settings available from the command line and / or thanks to third-party programs!
Comparison with analogue
NetSetMan has a paid PRO version, but the differences between them are minimal. In fact, by paying €18, you will receive:
proxy- an intermediate server between a computer and the Internet.- the right to use NetSetMan on a working PC;
- activate an unlimited number of settings profiles;
- functions for changing the proxy server, network domain and browser start page.
Therefore, it seems to me that it would be more apt to compare NetSetMan with a third-party application called WinAgents HyperConf:
In fact, the WinAgents HyperConf program is a kind of NetSetMan analogue for system administrators, since it is designed not only to automatically change network settings, but also to maintain these settings in working condition.
Yes, and a license for it is sold for at least 10 cars. Therefore, for an ordinary user, working with NetSetMan will be preferable.
Program installation
NetSetMan is installed like all programs: you download the archive, open it and run the installer, and then follow the wizard's prompts.
At the first stages of installation, you will need to select the application language and accept the terms of the license agreement, after which you will have the following choice:
There are three possible installation options here:
- Standard installation is the way NetSetMan will be injected into the system like all normal applications. That is, in the Program Files folder (by default), a directory with the program will be created, in which all the files necessary for work will be located. In this case, the utility settings will be saved in the system registry.
- Update - allows you to install a newer copy of the program over the one you already have. This method will only be available if you have used NetSetMan before.
- Extract files. This method allows you to simply unpack all the program files to the directory you specified. At the same time, nothing is written to the registry, and you can use NetSetMan as a portable application.
Perhaps we will finish installing the program in the standard way, although if you are a fan of portable software, you can complete the installation in the third way :).
Create your first profile
After the installation of the program is completed, its working window will appear in front of us:
![]()
It consists of a menu bar (at the top), a row of buttons (to the right of the program name) and six tabs, on which, in fact, all possible settings are collected.
In order to create the first settings profile, you need to call the context menu of the required tab (for example, Set 1):
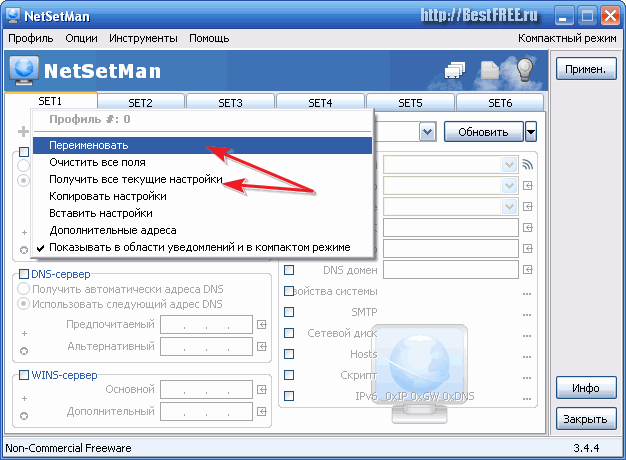
First of all, let's rename our tab to something convenient and understandable. To do this, click "Rename" and in the window that opens, enter a suitable name, for example, let's call the tab - "House" :).
After that, we need to go back to the context menu of the tab and activate the “Get all current settings” item there.
This action will automatically fill in all the fields with the settings that you have applied to connect to the Internet at the moment:
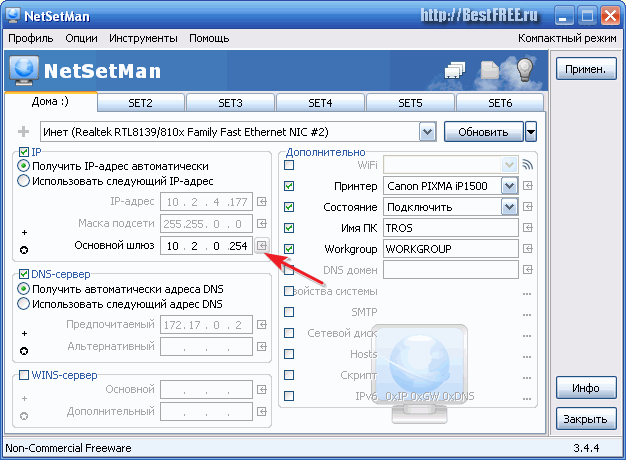
In addition, you can automatically fill in the required fields by clicking the arrow button located to the right of the required field (see screenshot above).
Working with the program
So, we have the first profile ready - it's time to create another one so that you can switch between them.
I have a city LAN connection at home, so as an example I will give the settings that I have to use if I want to connect to my parents' Network:

As you can see, for the Internet to work, it is usually enough for us to know our IP address and the IP of our DNS server (which in this case is the modem). However, there are more complex cases that NetSetMan will help us deal with.
MAC address(English) Media Access Control) - unique device number in the network.The first such case is the problem of changing the MAC address of the network card.
Usually such a need does not arise, however, if you have to work in several local networks, where traffic is distributed to the physical addresses of network devices, then you cannot do anything without this function.
Officially, NetSetMan does not yet have such a possibility (although the author announced its implementation in the next beta version), but it is possible to execute almost any scripts, which significantly increases the functionality of the program!
The script can be created in advance (and then simply opened), or you can write it directly in the window of a special built-in editor, to access which you need to check the “Script” item in the desired program tab and click on the button to the right of the item name:

Consider working with scripts on a specific example. By default, the Command line does not have the function of changing the MAC address, but it can be implemented using a third-party console program - macshift.
You will find this utility in the archive with the NetSetMan program. All you need to do is unzip the files validmacs.h And "macshift.exe"(third file - optional) to the root of the drive C:\ or in a folder C:\Windows.
Console(English) console) - a window for entering text commands.Thus, you have the opportunity to change the MAC address of the network card through the console. Now it's up to the small - you need to write scripts.
The macshift command syntax is very simple: macshift -i "Connection name" 2889-82-002B (required address).
We drive the line (with the MAC address changed to the MAC address you need) into any editor such as Notepad and save it as a BAT file.
Now it remains only to open the created file in the NetSetMan script editor (see screenshot above). Moreover, the script execution time can be set both “Before” changing the settings, and “After”.
Host file management
Next to the "Script" item is the "Hosts" item. Its activation allows us to make changes to the system file of the same name, which is responsible for resolving and forwarding the addresses specified in it.
One of the options for using the editing function of this file may be to restrict access to certain sites from your PC.
For example, I propose to "ban" the site vk.com :).
You can achieve this by giving the site the address of the local host (by default, 127.0.0.1 ). Activate the “Hosts” item in NetSetMan and use the button on the right (with the image of an ellipsis) to open the window for editing the system host file:

Now, following the syntax, on each new line we first write the address of the local host, and then, after a space, the address of the site to which we want to block access.
After the list is formed, click the "Finish" button.
The most important thing is that NetSetMan does not touch the standard host file entries, but can both add and remove site addresses added through the program.
Thus, you can create a profile, for example, for your children, in which to restrict their access to certain sites!
Managing system properties
The last function that I would like to draw your attention to is "System Properties". By activating this item in the NetSetMan window, you will be able, using a profile, to change not only network settings, but also some monitor, sound and power settings:

We figured out the capabilities of NetSetMan, so it's time to try using the profiles we created. To do this, just go to the desired tab (profile) and click the "Apply." in the upper right part of the program window:
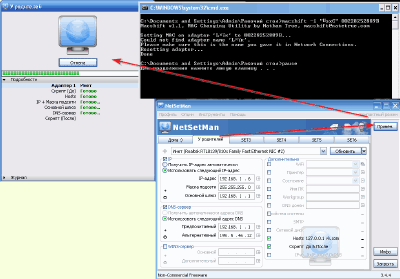
This will open a window that will display all the actions performed by the program.
Above the list of actions is a progress bar for applying the new settings, and above it is the Cancel button, which will change to the Done button when the network configuration is completed.
We press the last one and we get at our disposal a completely reconfigured Internet connection!
Additional tools and program settings
So, above we have already dealt with the principle of operation of the NetSetMan program and examined in detail some of its capabilities. Now it's time to get acquainted with some minor, but sometimes necessary features. It's about the buttons on the toolbar. There are only three of them:

- profiles. This button opens the profile management window. Unfortunately, in the free version we cannot delete any of the six profiles, but we can rename them.
- The note. This button allows you to leave short entries (up to 256 characters) with comments on the active profile. Here, for example, you can paste the script text in order to be able to restore it in case of file loss (see screenshot above).
- Auto switching. This button opens a window in which we can set up automatic switching to a Wi-Fi profile when an open network signal is detected.
Without proper attention, we were left with only the menu bar.
The first item - "Profile" - activates a menu similar to the context menu described at the beginning of the section on creating the first profile. Therefore, it makes no sense to describe it separately, and we move on to the second paragraph - “Options”:
Here we have three sub-points:
- import;
- profile export;
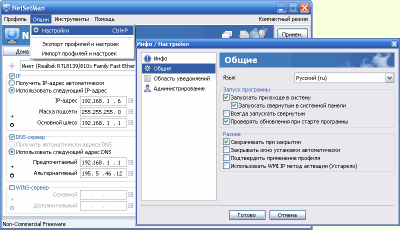
- and actually "Settings" themselves.
For example, if you forgot to set the interface language to Russian or want to disable NetSetMan autorun, then you can do it right here.
Also pay attention to the "Administration" tab. With its help, you can activate the encryption of all data stored in the program!
The third menu item - "Tools" - contains some standard links to the network connection management tools built into the systems and not only:

The last thing I want to talk about is the ability to work with NetSetMan in "Compact Mode":

To switch to this mode, just click on the corresponding inscription in the upper right corner. It is worth noting that you cannot edit profile settings in this mode, but switching the network configuration is much more convenient (at least in my opinion) :).
Advantages and disadvantages of the program
- simplicity of the interface;
- convenient profile change system;
- expanding the functionality of the program by executing scripts;
- the ability to quickly automatically obtain the current settings;
- access to the most requested built-in Windows features.
Flaws:
- there is no built-in function to change the MAC address of the network card;
- no built-in task scheduler.
conclusions
If you are a modern laptop owner and often use it while traveling to access the Internet, then NetSetMan is an indispensable tool for you that will allow you to forget about the inconvenience associated with changing network settings forever.
If you yourself are not very good at configuring network settings, then you can always ask your friends or colleagues (for example, an office system administrator :)) to do this only once, and then always enjoy uninterrupted access to the Internet!
Afterword
In the modern world, probably, there are practically no people left who would not use computer technology in one way or another. Most people today have more than one PC at home ... Moreover, the second computer is most often a laptop.
Still, with modern possibilities of almost ubiquitous access to the Web, laptops are still the most successful solutions for replacing a full-fledged office (and even multimedia) PC.
However, the whole variety of options for connecting to the Internet has one (and sometimes very significant) disadvantage - the need to change the connection settings every time.
Let's say you use a laptop as a work machine at home, in the office and with friends. At the same time, you “sit” at home on an ADSL connection, at work in a “local area”, and with friends on a “dedicated line”. And your laptop also has Wi-Fi, which you can use to surf on open networks ...
And for each case, you have to go into Network Connections every time and fiddle with the settings! Scary? Still :) But today we learned how to rid ourselves of this nightmare once and for all with the help of a fairly simple, but almost indispensable NetSetMan utility.
P.S. It is allowed to freely copy and quote this article, provided that an open active link to the source is indicated and the authorship of Ruslan Tertyshny is preserved.
I decided to make another separate page on which to collect all the useful programs that may come in handy when setting up / connecting to Wi-Fi, distributing Wi-Fi from a laptop, and when working with 3G / 4G modems. Well, and other programs that somehow relate to this topic. There are many good, free programs that allow you, for example, to start distributing the Internet via Wi-Fi from your computer. Or see the password forgotten from the Wi-Fi network. Well, a separate software with which you can configure 3G / 4G modems and perform other operations with them (firmware, uploading .prl files, etc.).
All the programs that you can find and download on this page have been checked by me, and detailed instructions are most likely written for them, the link to which will also be.
Programs for configuring Wi-Fi distribution
- using this program, you can quickly start distributing the Internet via Wi-Fi from your computer. The program is completely free, and in Russian. It is enough to set the network name, password, click on the Start button and open general access to the Internet. There are settings, you can configure the launch of the program with the computer turned on, and the automatic launch of a virtual Wi-Fi network.
It also displays a list of clients that are connected to your Wi-Fi. Switch Virtual Router works fine in Windows 10, tested. Well, in Windows 7 and 8 there will be no problems.
Programs for working with Wi-Fi networks
 is a free program that allows you to view information about Wi-Fi networks that your computer sees. Most often, the inSSIDer program is used to find the most free channel for a Wi-Fi network.
All information in the program is displayed in the form of graphs. In addition to the channel of a specific Wi-Fi network, you can find out its MAC address, name (SSID), signal strength, protection type, operating mode, etc. The program supports Wi-Fi networks at a frequency of 5GHz.
 is another free program that shows the necessary information about Wi-Fi networks: channel, signal strength, RSSI, MAC address, etc. It is a little simpler than inSSIDer. True, less functional.
Some antiviruses see this program as a threat. I think this is a false positive, due to such a few spyware features of the program.
Programs for working with 3G/4G modems
 AxesstelPst EvDO BSNL 1.67- a program that allows you to configure a 3G / 4G modem (antenna) for maximum reception. I believe that everyone who connects to the Internet via a 3G modem should use this program.
We launch the program on the computer, look at certain indicators, and use them to set up the modem, or antenna, and fix them. This will increase the speed of 3G Internet, well, and increase the stability of its work.
The page is gradually filling up. You can suggest your programs in the comments.
This article will discuss how to configure routers using specialized programs, and not through the web interface. As a rule, the program for configuring the router is written by the manufacturer of this device, and you can install it either from the CD from the package, or download it from the official website of the manufacturer.
There are also assistant programs for a specific provider, if the latter cooperates with the manufacturer of routers.
These programs are aimed at facilitating connection setup for inexperienced users, and the user is only required to select a provider from the list and enter a username and password, but first things first.
Assistant program from the manufacturer
First of all, let's get acquainted with the automatic configuration program from the manufacturer ZyXEL. The program is called Netfriend.
Before starting the setup, if the router has already been configured, then we do a full reset. To do this, press the "Reset" button on the back of the device and hold for 10 seconds.
Program installation
We insert the CD into the CD drive of the computer, the main program window will open. If autorun of disks is disabled on the computer, then we launch the disk through "my computer".

Main program window
Attention! At the first steps of setting up the network wire from the provider (WAN port), you do not need to connect!
We select the first item in the list - setting up Internet access. Netfriend installation will start.

Program installation wizard
During the installation of the program, the installation wizard will offer to install Yandex Bar. Install the add-on or not at your discretion.
After successful installation of the program, a shortcut will appear on the desktop, with which we launch the assistant.
Selecting the operating mode of the router
The first window after starting the program will be a brief instruction on preparing for the settings. It is desirable that all recommendations are followed.

Introductory Instructions Before Starting Setup

Choice of further actions
Of course, we are interested in setting up the router, select the first item in the list. Netfriend will immediately start automatically searching for a router connected to the computer. Our router must already be connected to the computer and turned on (except for the WAN port).
Choosing a provider, setting up a connection
In the next two steps, select the items for connecting via a leased line and setting up an Internet connection. Next, Netfriend will ask you to select a country, city, and provider from the list provided.

Provider selection
This list is quite large, it contains all large and medium-sized providers, the probability of not finding your own is very small.
In the next step, we will need to enter the physical mac address of the router. It is difficult to advise anything here, since further actions depend on the specific provider and connection technology. Some providers link the user account to the mac address, some do not. For your case, we take an agreement with the provider and carefully read the relevant section. If everything is too complicated, we take the phone and call those. support.
For example, let's enter the mac-address of the router.

MAC address selection
And the final part of setting up the connection is entering the login and identification password. They must also be included in the contract.

Internet access
At this stage, the program will ask us to connect the Internet cable. We connect it to the WAN port.

Internet wire connection
After the indicator LED on the front panel lights up, thereby informing us that an Internet cable has been detected, click Next.
Finally, the program will offer us further actions:
- Set up a wireless Wi-Fi network;
- Change administrator password;
- Finish setting up and exit.
We select the last item (or whichever you need), reboot the router and try to access the Internet. If everything is done correctly, there should be no problems.
Provider Program
Now consider an assistant program developed not by the router manufacturer, but by the provider. As an example, let's take the provider Rostelecom, the assistant program is written for the Sagemcom router [email protected] 2804.
As in the first case, insert the supplied CD into the computer drive and install the program. A shortcut will appear on the desktop - run the program.
Setting the provider region
At the first step of the quick setup, we will be asked to select the mode of operation of the wizard.

Wizard mode
Since we are setting up for the first time, we select the full setup item. Click Next. Next, we will show a program where we intend to access the Internet.

Provider region selection
For convenience, we see a map of Russia - just click on the region where we are now, and the wizard will recognize the region itself. Click "Next", where we will be asked to specify the branch of the provider (if there are more than one in this region).

Area selection
Wire connection

Selecting the type of connection
Of course, if we connect via Ethernet, then we specify it. But in most cases it is ADSL.
The wizard will tell us with a picture what and where to connect.

Internet cable connection
And in the next hint picture, he will ask you to connect the power to the router. We connect the power supply.

Connecting the Power to the Router
We turn on the router with the button, the LEDs on the front panel will light up.
Internet connection setup
The last thing left is to set up the connection itself. We get an agreement with the provider, and in the next window of the assistant program we write the login and password specified in the agreement.

Entering a username and password
Check the box if your ISP does not require this information. Click "Next".

Equipment connection example

Automatic router configuration
Setting up a Wi-Fi router
And at the last step, after successfully completing the setup, the assistant will ask about the wireless Wi-Fi network.

WiFi setup
You can leave it as it is (all data is visible), you can change it.