The service life of a band saw for wood directly depends on the quality of its sharpening. It can be performed both independently and by resorting to the services of specialized companies. In the first case, it is necessary to familiarize yourself in detail with the technology and a number of features.
Band saw design
The band saw belongs to the category of cutting tools and is an integral part of specialized woodworking equipment. It is a closed tape, on the outer edge of which there are teeth.
For manufacturing, special grades of steel are used - 9HF, B2F or C75. During the manufacturing process, the teeth are treated with high-frequency currents. This increases their hardness. It is this fact that affects the separation of the cutting edges and maintainability. Often, several types of steel are used in the manufacture. The main belt is made of spring, and the cutting part is made of steel with a high content of tungsten or cobalt.
Features of the use of band saws for wood:
- wood requirements. The harder it is, the faster the blade will become dull;
- installation conditions. The tension indicator must be observed. If it is less than required, sagging will occur. With strong tension, the likelihood of breakage of the web will increase;
- periodic sharpening. This will require a special machine.
- tooth pitch. This is the distance between the cutting elements of the structure. Common values are 19, 22 and 25 mm;
- tooth height. The value from its base to the top;
- corner. The main value that you need to know to form the cutting plane. For carpentry models, it is 35 °. In dividing saws, the angle is from 18° to 22°. In structures for processing timber - 10 ° -15 °;
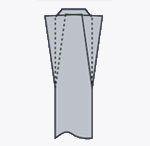
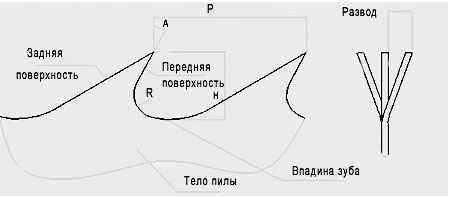
- divorce. Determines the deviation of the tooth from the general plane of the blade.
- classical. Alternate bending of the teeth relative to the blade to the right and left sides;
- cleaning. The first and second teeth deviate to the right and left, while the third remains unchanged. This technique is used for saws that are designed for processing hard rocks;
- wavy. The angle of the wiring for each tooth is individual. As a result, they form a cutting edge resembling a wave. The most difficult type of wiring.
- The emery goes down. At this time, the front edge with the cutting edge is processed.
- Formation of a cut in the depression. This is done without leaving the canvas. This stage allows you to remove microcracks and irregularities. An important point is to reduce surface tension, which is the main cause of web deformation.
- The circle moves up. The back of the tooth and its cutting edge are machined.
- Rollers must be aligned horizontally and vertically
- The roller must not push the saw down from its free state by more than the amount specified by the manufacturer, depending on the type of machine.
- The back side of the saw should not be more than the amount specified by the manufacturer, depending on the type of machine, from the stop lug of the roller.
- Tape devices designed for cutting wood are made from alloyed tool steel, which has a hardness of 40 to 46 HRC.
- The width of the cut (kerf) for tape tools is much smaller than for disk counterparts. When cutting cheap wood, this moment is not so noticeable, but when cutting valuable and exotic types of wood, it is critically important.
- The machine can cut workpieces of any size. At the same time, the band tool works quickly and creates a high quality cut.
- There is very little waste (chips, sawdust) when using this type of saw.
- With the classical method, the teeth are bent left and right in strict order.
- With the cleaning method, every third of the teeth remains in its original position. It is optimal for devices designed for cutting especially hard woods.
- With wavy wiring, each tooth is given its own separate amount of bend. In this case, the web profile takes the form of a wave. This method is the most difficult.
- The need for surgery is determined visually. At the same time, attention should be paid to the condition of the teeth and the quality of the incision walls (for example, their increased roughness).
- Circles for the point of the tape tool are selected based on the degree of hardness of the teeth. To work with tool steel fixtures, corundum discs are required. Bimetal saws are sharpened on borazone or diamond wheels.
- The shape of the emery for tape devices must be chosen based on their parameters. Known circles are cup, profile, dish-shaped, flat.
- Before carrying out the operation, it is necessary to unscrew the saw and let it hang in this position for about 10-12 hours.
- The removal of metal along the profile of the teeth must be uniform.
- Excessive pressure on the sharpener must be stopped. It can lead to annealing.
- The profile of the blade and the height of the teeth must remain unchanged.
- Liquid cooling must be provided during the operation.
- Burrs on the teeth should not occur.
- It is of the highest quality, the operation is carried out on an automatic machine.
- Elborovy emery, chosen exactly in shape, passes the entire surface of the interdental cavity at the same time with the accompanying planes of adjacent teeth in one movement.
- The creation of angularities at the tops of the teeth is completely eliminated.
- The relative minus of such sharpening is the need to have at your disposal the appropriate number of circles for canvases with different profiles.
The implementation of the last point will increase the service life of the tape structure. However, it is problematic to make sharpening on your own - you need to choose the right wiring, observe the angle of the blades.
When buying a used saw, you need to pay attention to the presence of repair welds on the blade. They indicate frequent tool failures.
Forms of the cutting part and sharpening angle

At the first stage, the type of band saw is determined. The main indicator is the shape of the teeth. Depending on this parameter, they are divided into dividing, carpentry or intended for sawing logs. The initial geometry and the angle of the wiring are determined by the manufacturer. It is recommended to find out these data at the stage of purchasing components. They are needed to determine the parameters of the machine.
For hardwoods, the rake angle should be kept to a minimum. This ensures optimum contact between the workpiece material and the metal. If you plan to process soft varieties, you can use models with a large rake angle to increase the processing speed.
The defining parameters for self-renewal of the cutting edge are:
After the work is done on the machine, ideally, these characteristics should remain unchanged. For each model, the manufacturer determines the maximum deviation value. If during operation it is reached, it is necessary to purchase a new model.
In order to eliminate resonance in some types of cutting tools, a variable pitch of the teeth is made. This does not affect manual sharpening, but requires careful setting of parameters during automated sharpening.
Band saw wiring
Before forming the cutting edge, the correct setting of the teeth must be done. During the entire period of operation, due to constant loads, their location may change. Therefore, first the geometry is adjusted, and then sharpening.
The wiring is the bending of the teeth relative to the plane of the main blade. This procedure is performed only on a special machine. In the case of large discrepancies along the entire length of the tape, premature damage or breakage of the web is possible. Therefore, before that, you should decide on the type of wiring.
The angle of inclination must correspond to the original. The type of wiring is also taken into account, which can be as follows:
During the bending, not the entire tooth is deformed, but only part of it. Often the deviation occurs in 2/3 of the total height.
The average divorce value is limited to values from 0.3 to 0.7 mm. This applies to standard models of band saws for wood.

The correct choice of the type of grinding wheel is important. It must correspond to the steel grade from which the band saw is made. Corundum wheels are used for tool steel structures. If it is required to improve the cutting properties of bimetallic models, CBN or diamond wheels should be used.
Depending on the technical capabilities, it is possible to perform full-profile processing or each cutting part separately. In the first case, you will need an elbor circle, the end of which has the same shape as that of the saw. For the second option, each tooth is processed.
You will first need a machine. It must have the functions of regulating the speed of rotation of the disk and changing its location relative to the tool. After fixing the blade in a special frame, you should perform such actions according to the following instructions.
By the same method, all other teeth are updated. It is important that the entry and exit angles are the same everywhere. Otherwise, if the geometry differs in one of the parts, the performance will deteriorate.
With prolonged contact of the circle with the metal, the temperature on the surface of the latter can rise sharply. To eliminate this effect, special coolants are used that come directly from the machine. Feeding is carried out constantly to avoid the formation of a glow zone. In this part, the mechanical strength will be degraded.
To avoid chipping, the presence of metal components in the wood should be checked before processing the wood. Also, special attention is paid to fixing and uniform feeding of the workpiece for sawing.
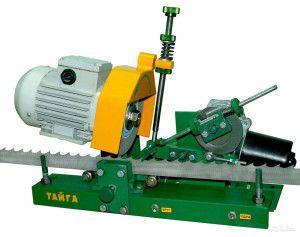
OPERATING INSTRUCTIONS FOR BAND SAW
WOOD-MIZER BAND SAW OPERATING INSTRUCTIONS
The WOOD-MAIZER saw is made of high-carbon steel and heat-treated in such a way as to ensure maximum stability of the saw in the cut, which is why our company recommends the use of the WOOD-MAIZER saw, however, any positive quality cannot but have accompanying side effects. There are also WOODMAIZER saws. They require a stricter attitude on the part of operators and sharpeners.
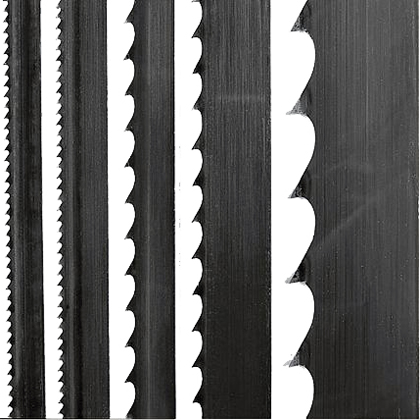
1 STEP TOOTH BLADE
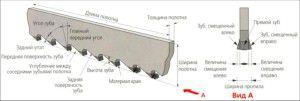
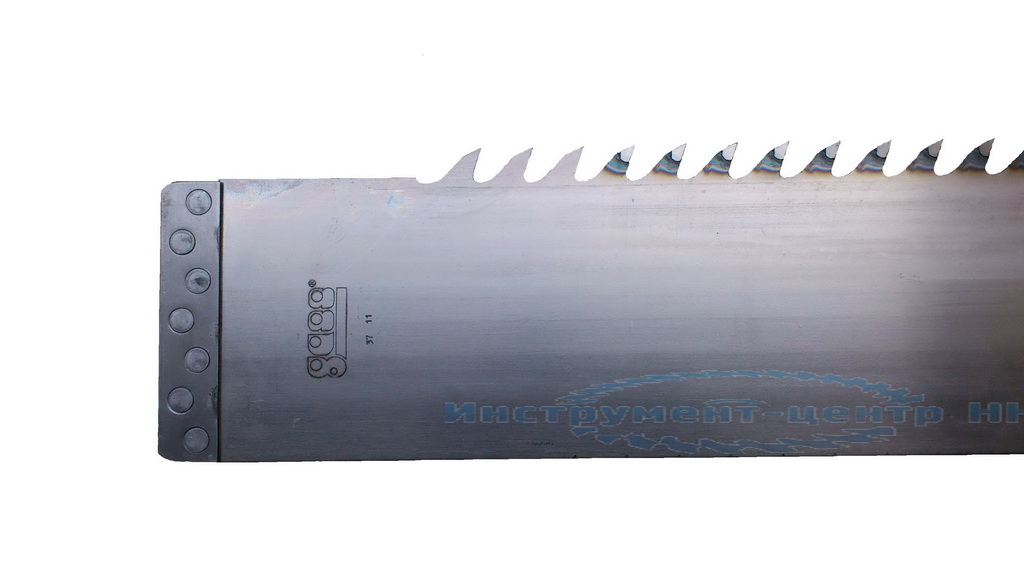
The pitch of a blade is the distance between the tops of two adjacent teeth. For WOOD-MIZER blades, it is 22.0 mm. The pitch of the tooth is constant and does not change during the sharpening process.
Tooth height is the distance between the base of the interdental cavity and the top of the tooth. Due to the presence of an interdental recess, sawdust is removed from the working area of the blade during sawing. The height of the tooth must be sufficient to ensure the removal of sawdust that accumulates in the interdental recess during the sawing process.
The height of the teeth of the WOOD-MIZER blades is optimal for any kind of sawing. When sharpening the blade, the height of the tooth decreases. To maintain the required tooth height, it is necessary to deepen the groove between the teeth until the tooth height is 4.8 mm. See Table 1 at the end of this section.
Blades with 4.8 mm high teeth. used for all kinds of sawing. Blades with 4.0 mm high teeth are mainly used for sawing frozen, hardwoods. Blades with 4.3-6.4 mm high teeth can be used on very soft woods.
3 SHARPENING ANGLE
Sharpening angle, degree of sharpening and tooth setting are the most important factors that affect blade performance. All these factors affect the quality of sawing and the productivity of the sawmill.
The sharpening angle is the angle of deviation of the end of the tooth from the vertical. Due to the presence of a sharpening angle, the tooth “hooks” on the wood. The tooth must penetrate deep enough into the wood that the blade itself can efficiently eject the sawdust. If the sharpening angle is too large for a given saw feed speed, then this can lead to vibrations and, as a result, a deterioration in the quality of the cut. With a small sharpening angle, the tooth will not enter the wood to a sufficient depth, which can lead to additional loads during sawing and a deterioration in the quality of the cut.
The angle of sharpening depends on the type of wood being processed and the productivity of the machine. As a rule, the smaller the angle of sharpening, the lower the productivity of sawing machines. See Table 1 at the end of the section.
4 END ANGLE
The butt angle is the angle of deviation of the butt of the tooth relative to the blade itself.
With a non-deflected position of the tooth, the end angle is 90 degrees. When spreading the blade, the butt angle changes by several degrees and becomes more than 90 degrees.
5 TEETH SET
Tooth setting is an important factor influencing the cutting performance of a blade.
The tooth set is the linear value of the deviation of the tooth by a given angle relative to the plane of the blade. The greater the set of teeth, the wider the cut and the greater the effort required to apply when sawing.
See Table 1. The recommended tooth setting is typically 0.5 - 0.55 mm for 1.1 mm blades. When working with hard thresholds and frozen wood, the amount of setting should be in the range of 0.4 - 0.45 mm for 1.1 mm blades. A large setting is used when working with soft woods (0.55 - 0.6 mm for 1.1 mm blades).
Remember that when sharpening the teeth and reducing their height, the set also decreases and the blade teeth need to be set.
The WOOD-MIZER saw was originally designed to be much more rigid than almost all of its main competitors, so it does not lose stability at a lower tension than other saws, and the lower the tension, the less stress that occurs in the blade and, as a result, the less likely it is to break. saws.
In order to correctly set the blade tension on the sawmill, do the following:
It is necessary to cut at the lowest possible tension (150 - 170 atm.) This will extend the life of the saw.
In order to get high quality lumber without overpaying for saws, you need to follow a number of simple requirements:
a) It is necessary to monitor the condition of the belts on the pulleys, two belts cost less than one saw, so you can afford to change them a little more often, and save absolutely incomparable money on saws. It is absolutely unacceptable for the saw blade to pass through metal, if this happens, then the saw will not stand even for one hour.
b) It is important to correctly align the saw blade on the pulleys: the distance from the root of the tooth to the edge of the pulley may vary depending on the type of machine.
c) Align the guide rollers correctly:
d) When turning the saw, the shape of the tooth must be repeated exactly with the sample.
e) The layout of the web must be suitable for the work being done, as the web,
confidently sawing a log with a diameter of 30 cm will not cut with the same success
a log with a diameter of 60 cm, because the volume of sawdust removed from the cut is approximately twice as large.
f) Choose the right saw blade lubricant. The optimal lubricant is a mixture of 50% diesel fuel and 50% chainsaw tire oil (for sawing at temperatures below -15°C). This mixture should be applied to the saw in a thin layer by spraying. Lubrication should not be much, one spray is enough for a while. You will easily notice that it is time to lubricate more by how the sound returns, which was lost after applying the lubrication. Apply lubricant so that it gets on both sides of the saw. The use of lubricant will also allow you to reduce the number of “blooming” boards from sawdust and water falling on them.
g) RELEASE THE SAW AS YOU HAVE STOP SAWING
In the process of sawing, the saw blades HEAT up and, as a result, increase in length. As the blades cool down, they tend to shrink back to their original size, and in the process, excessive stresses occur in the blade. In addition, the memory of the shape of the two pulleys remains in the saw, which does not lengthen the life of the saw.
Besides. the belts on the pulleys turn out to be crumpled, which makes them, firstly, not round and adds additional vibration to the saw, and secondly, it jams the “hump” on the belt, which ensures that the saw is centered on the pulleys.
HOW TO KNOW IF YOUR SAW IS CORRECTLY SET?
Divorce can be considered optimal when there is a mixture of 65-70% sawdust and 30-35% air between the saw blade and the tree that it cuts through. The outward manifestation that the saw is set correctly is that it throws approximately 80-85% of the sawdust out of the cut.
In the case when the saw setting is insufficient, densely pressed hot sawdust remains on the surface of the board, it is impossible to think of anything worse for a saw. The sawdust should be warm, not hot or cold.
A saw that is set too far is likely to cut jerky, and a saw that is not set too far will ripple.
If you are sawing logs with a diameter of 30 cm at a good speed and the sawdust is warm to the touch, then you should not try to saw a log with a diameter of 60 cm with the same setting, because it will have to remove twice as much sawdust from the cut, which means you should increase the setting (approximately by 20%).
Conclusion: logs should be sorted by thickness before they are sawn.
Another very important point: only the upper third of the tooth should be parted, do not part the tooth under the root, only the sharp corner at the very top of the tooth should be involved in the sawing process.
Do not forget that the softer the tree you are sawing, the larger the divorce should be.
The saw should be sharpened after free sagging for 4-5 hours in an inverted state with minimal metal removal (if necessary, several times), and then deburr and breed. The main rule: the best divorce is obtained by you experimentally; calculate.
Do not forget that the indicator on your sharpening device is a thin device. It doesn't cost anything to reset it. It works in an extremely intense mode, judge for yourself: your saw has approximately 220 teeth. You sharpen the saw 15 times, it turns out that for the life of the saw; the indicator works when it is set at least 3.5-4 thousand times (often you have to set the tooth in several steps). This example is provided to remind you of that. that the indicator wears out over time and that check its installation more often .
It has been repeatedly proven that the quality of the cut depends to a large extent on the shape of the teeth of your saw. The shape of the tooth was developed and verified
years and it is not advisable to conduct these experiments again. Therefore, it is advisable to have a sample (30 centimeters) of the saw and control the shape of the tooth every time you sharpen the saw.
HOW TO SOLVE POSSIBLE SAWING PROBLEMS
1. When entering the log, the saw jumps up and when you remove the board, it is curved like a saber. This is most likely due to the fact that the angle of sharpening the tooth is too large, and the set is not enough. Try to reduce the angle of sharpening the tooth by a couple of degrees and increase the divorce by 2-3 thousandths; to the side.
2. When entering the log, the saw jumps up and cuts exactly almost to the end of the log, after which it falls down. This phenomenon is called “squeezing out” or “squeezing out”, that is, they say: the saw is squeezed out. This is most likely caused by a too large angle of sharpening the tooth. Try reducing the sharpening angle a couple of degrees.
3. The saw dives down and cuts straight after that. This may be due to several reasons, for example, that the saw has become blunt, however, most likely, the reason for this phenomenon is the insufficient angle of sharpening the saw, which may in turn be caused by the fact that the sharpener does not fill the stone in a timely manner, inspect the blade carefully if the shape tooth seems ideal to you, then you should increase the angle of sharpening the tooth by a couple of degrees.
4. The saw "dives" down and when you remove the board, it curves like a saber. This is most likely caused by insufficient sharpening angle and insufficient wiring at the same time. Look at the canvas carefully, if the shape of the tooth seems ideal to you, then you should increase the sharpening angle by a couple of degrees and increase it by 2-3 thousandths per side.
5. The cut comes in waves. If the saw is sharp, it is due to too little set, increase the set by 0.006-0.008 inch per side on the indicator.
6. There is too much sawdust left on the board and it feels loose to the touch. This is most likely caused by too much set-up and if you look closely you will see characteristic scratches across the board, the so-called "tooth marks". As you probably already guessed, you should slightly reduce the spread of the saw.
7. Sawdust “rolls” on the saw blade. This is due to the fact that the saw is not sufficiently diluted and there is not enough air left in the cut, the saw blade rubs against the sawdust, it heats up and the wood dust bakes onto the saw. Increase the set 0.005" per side of the indicator.
8. The filings "roll" on the top surface of the tooth, but this does not happen on the surface of the saw. This is due to poor sharpening quality (too much feed or too much metal removal and, as a result, poor surface quality at the tooth cavity), or too high a sharpening angle of the tooth, or the fact that the blade was continued to saw after it had already become dull.
9. The sawdust on the board is compressed and hot to the touch. The set is not enough, you should increase the set by 0.003 inch per side on the indicator. Reduce sharpening angle.
DO NOT FORGET THAT SAWING WITH A UNSET SAW IS THE FASTEST WAY TO TEAR IT
10. The saw is cracked at the back. This is because the back stops of the idlers are too far from the back of the blade. The distance from the back of the blade to the stop of the guide roller must not exceed the value indicated on the reverse, depending on the type of machine.
11. A new, never re-sharpened saw cracks in the cavity of the tooth. This is most often caused by the blade not being thinned enough for the job it is trying to do (see point 4 of the basic sawing rules), or by continuing to saw the blade after it has become dull), or could have happened after the first cut, if the log was sufficiently "rolled" in the sand.
12. After resharpening, the blade is covered with cracks in the tooth cavities. During resharpening, too much metal was removed at one time, resulting in a regrind of the tooth surface. Or this is due to a change in the geometry of the tooth. Compare the geometry of the tooth with that which was originally by attaching a piece of blade to the saw that has never been resharpened.
Sharpening band saws for wood: profile, teeth and sharpening angle. Tool layout and sharpening methods
Band saws are designed for cutting various materials, including wood of various hardness levels. Their working part is a closed steel tape with teeth.
The price of sharpening band saws in special workshops is relatively low. But often the speed and quality of order execution are not very encouraging. Based on this, the work can be done on your own.
Band saws need periodic sharpening.
Design features of band saws
Note!
In order for the machine to always work stably and efficiently, its maintenance should be approached with the utmost responsibility.
Sharpening and wiring band saws on wood should be carried out in a timely and competent manner.
Profile, teeth and sharpening angle
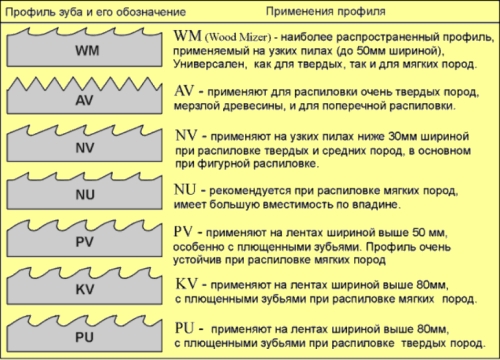
International classification of tooth profiles.
Tape devices have different tooth geometry, which depends on the type and characteristics of the materials being cut. The tool for wood can be carpentry and dividing. There is a third type, designed for sawing timber, logs. All these subspecies have their own parameters and shape of teeth.
The sharpening angle of band saws for wood is selected by the manufacturer based on several points. The main one is that the harder the material, the smaller the rake angle should be. Below is a table with the main parameters of the saws.
Preparing the device for work
In the course of continuous use of the tool, a decrease in the quality of the cutting edge is inevitable. It blunts, and the width of the breeding teeth decreases. Based on this, sharpening a saw for wood and its wiring are necessary components of the maintenance of a band saw.
It should be noted that the setting of the teeth should be carried out before they are sharpened, and not vice versa.
Tool layout

The use of a cutting machine.
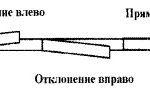
Wiring is the process of bending the teeth to the sides. This operation is necessary so that the saw blade does not clamp in the workpiece, as well as to reduce friction during operation.
There are 3 main types of breeding.
Note!
When wiring, you should not bend the entire clove, but only its third or two thirds from the top.
Manufacturing companies are advised to carry out the operation so that the bending range is within 0.3-0.7 mm.
The work is done with the help of a specialized breeding tool.
Saw sharpening
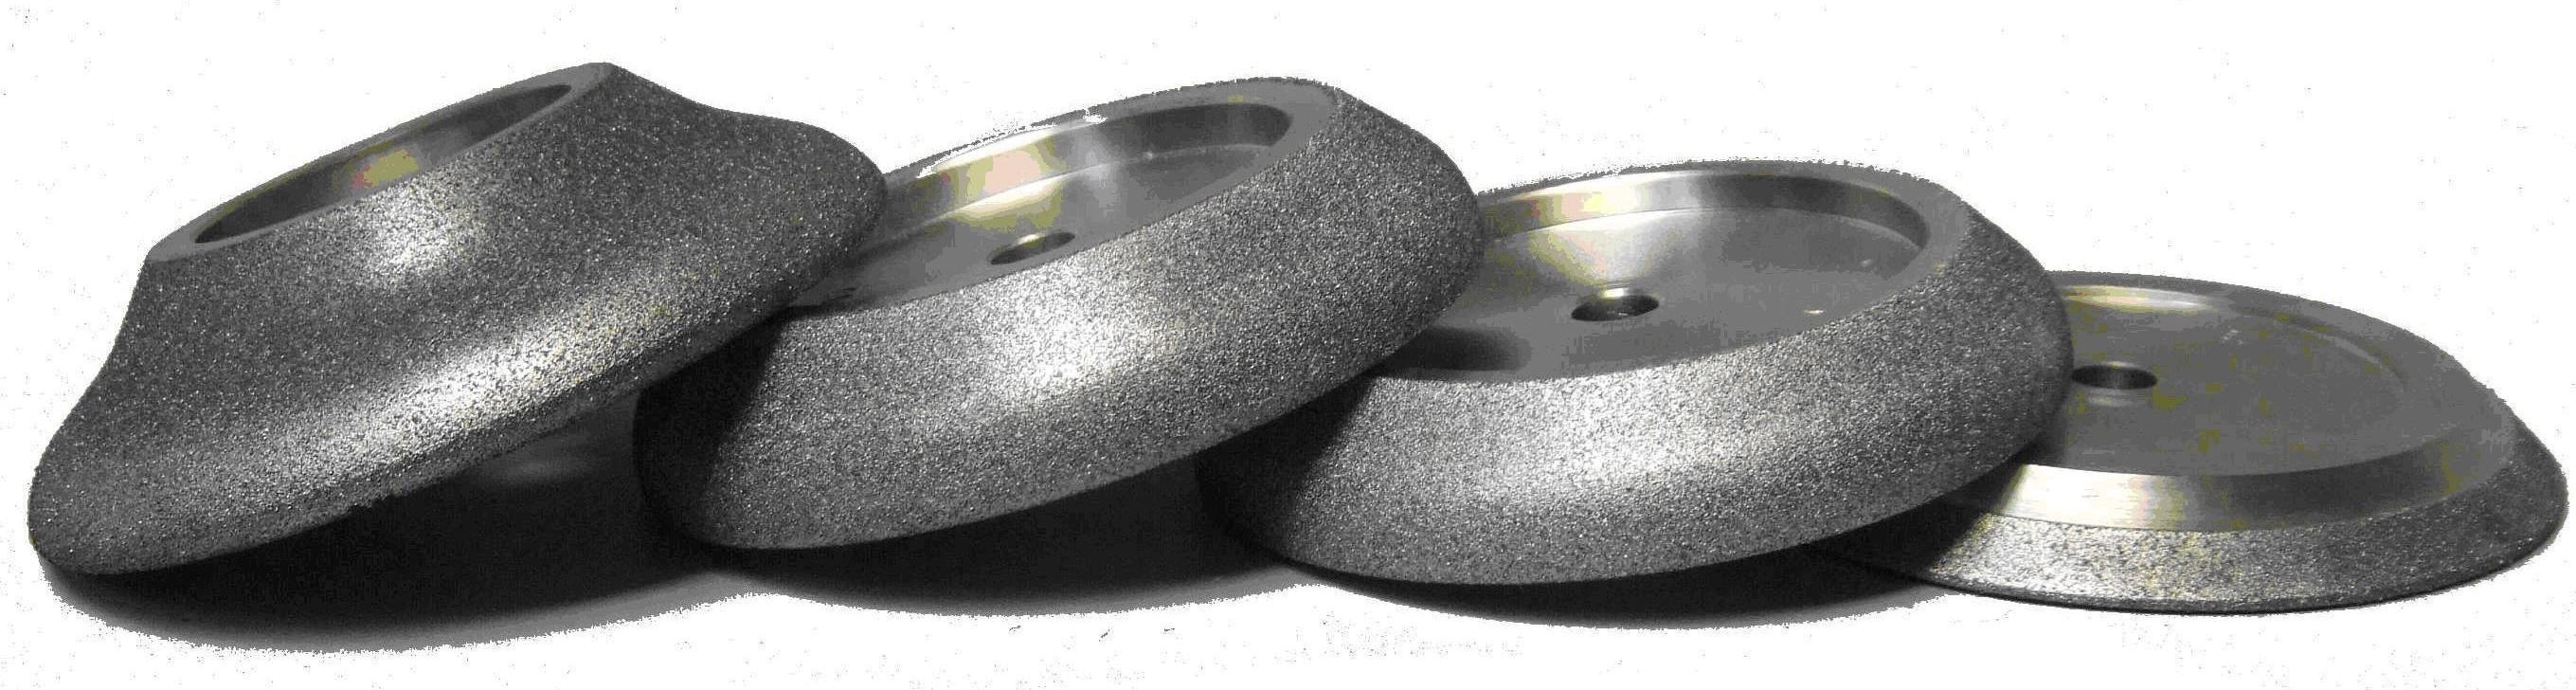
Elbor circles with different shapes.
Before you sharpen a saw blade for wood or band tools, keep in mind that more than 80% of incidents with damage to fixtures (including breakage) are due to non-compliance with work standards.
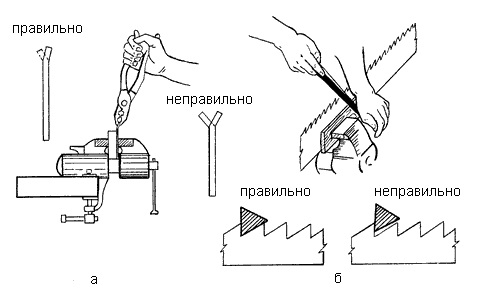
Manual tool maintenance.
The scheme for sharpening a saw on a tree should take into account the following provisions.
Pay attention!
The theoretical instruction for sharpening band saws on wood informs that it should be done either on the front side of the teeth, or both on the back and on the front.
In real life, most specialists and amateur craftsmen perform the operation only on the back side, because. it's more convenient.
Sharpening methods
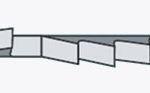
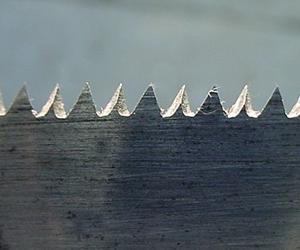
The photo shows automatic full-profile sharpening.
You can prepare the tool for work using special sharpening devices (for example, machines with circles of different material and shape) or manually. Before you properly sharpen a saw on a tree, you should learn the basic methods for this operation.
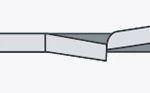
The first way is full profile sharpening.
Edged tool.
The second method is sharpening the edges of the teeth.
You can do this both manually and using a professional machine.
- Having chosen the machine, it is necessary to decide on the circle used. It is usually flat. Specialized sharpening devices should be resorted to only when there is a lot of such work to be done.
- In domestic conditions, sharpening is best done with your own hands - on ordinary mechanical emery or with the help of an engraver. When carrying out the operation, do not forget about personal protection and use gloves, a mask or special glasses.
- When you and your neighbors do not have an engraver, a machine tool, emery, you can sharpen a band saw using the traditional folk method - using a needle file.
- If a machine is used to sharpen the fixture, it should be inspected before starting the operation to determine whether the wheel is in the correct position in relation to the saw.
- It is necessary to remove such a layer of steel from the sinuses so that all microscopic cracks are guaranteed to be removed.
- If the saw has been used without maintenance for longer than the period allowed by the manufacturer, the amount of metal removed per sharpening must be increased.
- To control the results of the operation, always use a new product as a reference.
- The shape of the teeth is a characteristic developed and verified by specialists. By changing it, you will not be able to effectively process workpieces. Based on this, sharpening must be done so that the shape of the teeth and the profile of the blade remain original, factory.
- Subject to all the rules of operation and maintenance, the tape tool will serve you faithfully until its width is worn off to 65 percent of its original value.
- Burnt sinuses of saw teeth. This happens due to the application of excessive effort when working with a grinding disc. This defect leads to the fact that the teeth become dull very quickly.
- Suboptimal tooth angle and irregular, angular shape of the sinuses.
- demolition of the eccentric of the grinding machine;
- incorrectly set angle of inclination of the machine head.
- illiterately selected profile of the grinding disk.
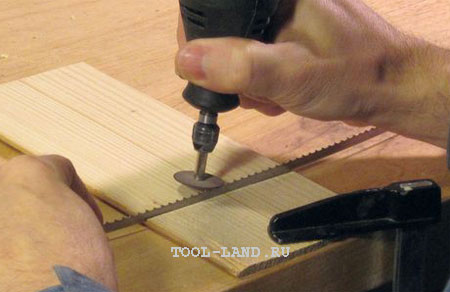
Working with an engraver.
The result of improper work - the teeth of the tool are burnt.
Note!
There is a widespread opinion among amateur craftsmen that there is no particular need to remove burrs that occur during processing.
It is fundamentally wrong, so microscopic cracks can occur in the canvas.
After completion of work, the tape device must be immediately cleaned of wood sap, sawdust, resin. Before starting maintenance, the tool should be carefully inspected, otherwise you will clog the circle. This will lead to a significant decrease in sharpening efficiency.
Common Mistakes
This sharpening result is possible due to several errors:
Before you sharpen a wood saw correctly, you should learn how to do it. There are several service methods. They depend on the type of saw, its profile, the shape of the teeth. The video in this article continues to inform you on its topic.
- Order on the appointment of the general director of an LLC sample The general director performs the role of the sole executive body in the LLC. He is one of the founders of the company or is invited from outside. The law leaves the decision of this issue to the discretion of the participants of the company. But he regulates in detail […] Legislative base of the Russian Federation Free consultation Federal legislation documents Recovery of documents The procedure for recovering documents depends on their type and circumstances of disappearance.In case of loss, theft, damage of important papers, it is necessary to write an appropriate statement and contact […]
- Online magazine for an accountant Child benefits from May 1, 2018: new sizes Its value will be equal to the subsistence minimum for the 2nd quarter of the previous year, i.е. RUB 11,163 Compared to the previous […]